

In the previous post, the main concepts of Machine Learning has been explained very briefly. However, if we want to talk about Machine Learning, it needs to read a whole book. In the second part, I am going to show the main Azure ML environment and its essential components.
Azure ML has two type of subscriptions: Free, and Standard.
In this post I am using free subscription. The extensively explanation of the Standard subscription will be explained in last part of this series.
To sing in to the Azure ML portal, you can use any of your email account: Gmail account, Microsoft account, or company email.
using this URL to log in to azure Ml studio: https://studio.azureml.net/
First, you should login to the signing page as below

image 1. Login Page
Then, after sign into the azure portal, you will see below page. Azure ML studio has different components. The first component is “Experiments”. experiment is the first place that we will use for creating a machine learning project (number 1). to Create a new experiment, we have to click on the “New” icon in the bottom of the page. The list of created experiments will be shown in middle of the page (Number 3). if you want to delete an experiment, you first should select it, then click on the “Delete” icon (number 4). Moreover, for copy specific experiment, just select it and then click on the “Copy experiment” icon (number 5).
In the left side of the window, we have other components such as “Web Services”, “Notebooks”, “Datasets”, “Trained Models” and “Settings”.
“Web services” is a place that the created web services will be shown there and you able to see them (I will explain the process of creating web services in the next series). Also we have “Notebook” component, for Python users (number 7). The imported dataset and new datasets will be accessible via “Datasets” icon (number 8). Moreover, the “Trained Models” also store the created models that we can use in other applications (will explained it in the next parts). and finally, “setting component” that help us to arrange the environment.

Image 2. Main Page
In this series I will talk about “Experiments”, “Datasets”, “Web Services”, “Trained Models”, and the “Setting”.
In this post, we first look at the “experiment”. In the experiment, we able to create a new Machine Learning Module. In experiment area we have a drag and drop environment, that we able to put items from menu in the left side to the middle of screen (Number 1). Moreover, we able to put some more description about the experiment we are creating in the right side of the screen (number 2). Each Experiment could have specific name on top of the page (Number 3) that has been assigned by user. All the main components and tools for creating a machine learning module have been put in the left side of the screen (Number 4). We also able to “Save/ Save as” the component (number 5). Finally, after creating model, we can “Run” the experiment.

Image 3. Experiment
According to the Part 1 of this series, the first step after identifying the business problem, is about data gathering, data cleaning, data filed selection and splitting data.
to start a machine learning process, we have to get data first from resources.
There are couple of options to fetch data.
1. Import Data set
first approach to import data, first click on the “database” icon on the left side of the screen
then in the Data set window, first click on the data set icon in the left side (Number 1), then on the “New” icon on the bottom of the page.
Then, below windows will be shown up. To import the dataset from your local pc, you should click on the “dataset” icon (Number 1), then click on the “From Local File” icon (Number 2)
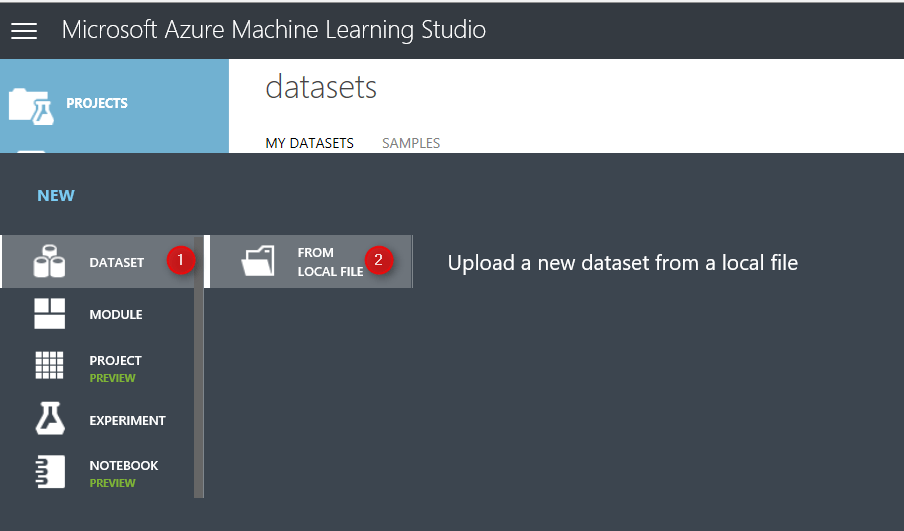
Then, you able to upload a new data set into the Azure Ml experiment. Just brows your pc to select the data set. There are some limitations on data set type as just able to import directly from local pc just : CSV, TSV,TXT, ARFF, Zip and Rdata data types.
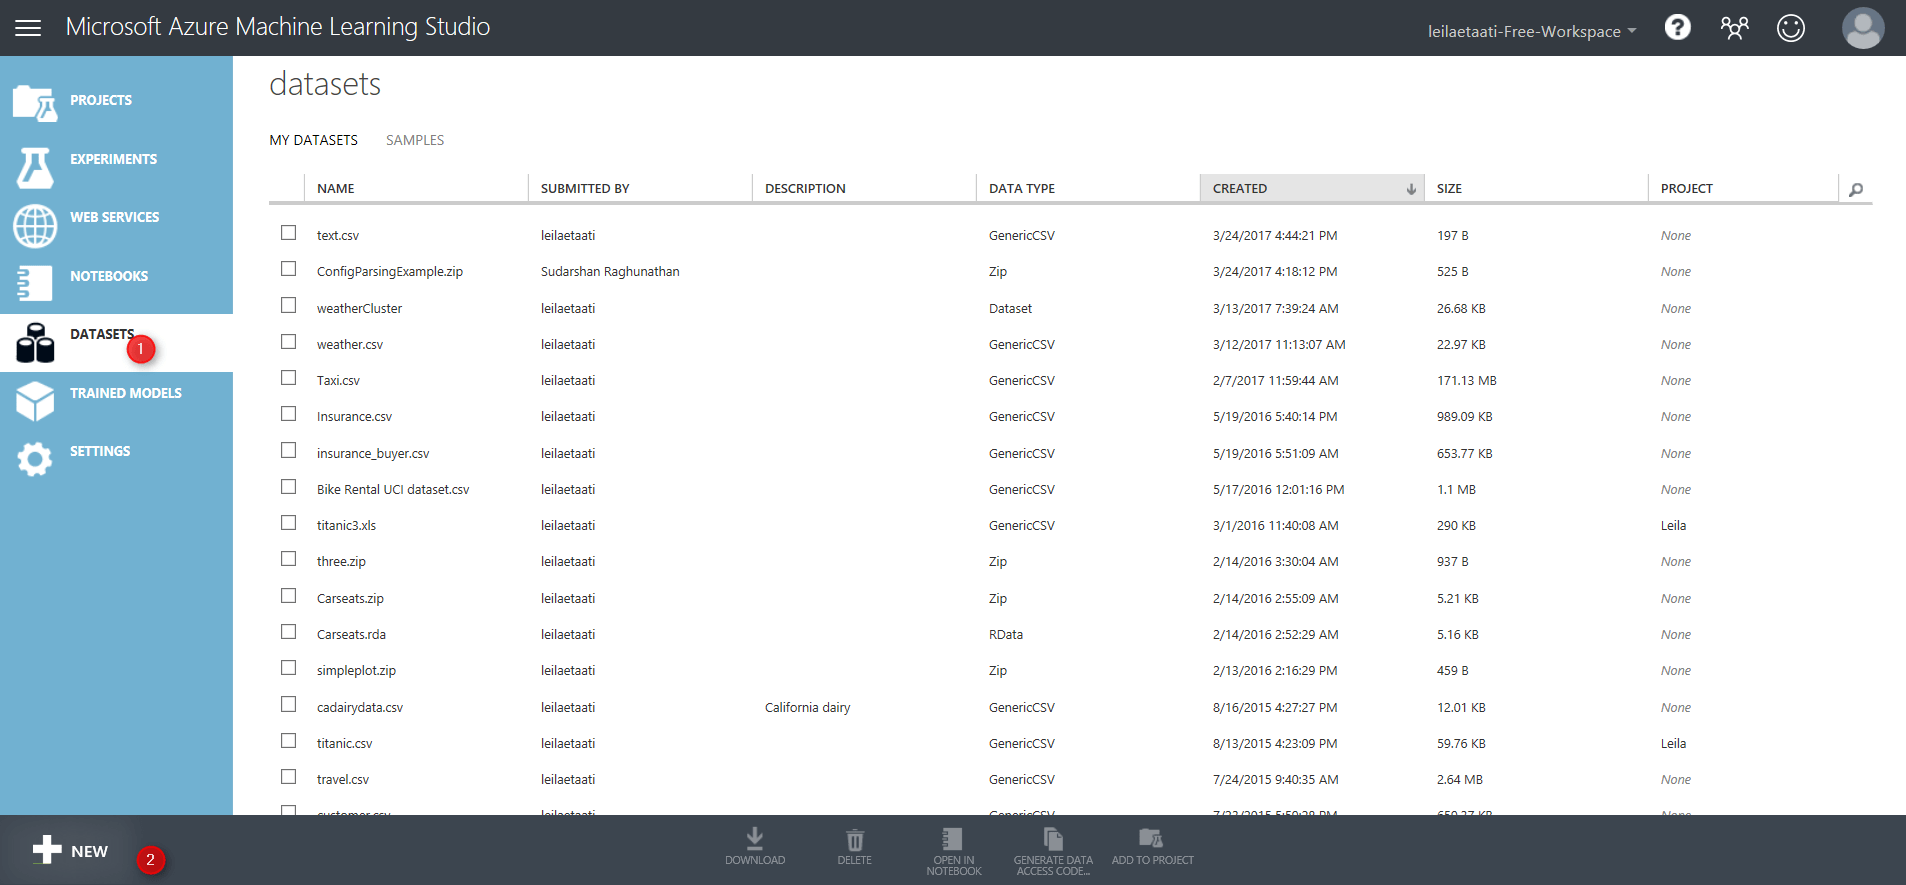
After selecting datatype (number 2),just approve it (number 3). You will able to see the data set in the Azure ML environment.

In the azure Ml experiment area, you will see a “Saved Datasets” icon, also under the “My Datasets” you will find uploaded data set. However there are some predefined data set in the system as Microsoft provided them for users (Number 3).

Importing data from local pc is not the only way for importing data, the other way is using component “Import data”. just type word “import” in the search bar in number 1. you will see under the “data Input and Output” component, we have a module name “Import data” (Number 2 & 3). Just Drag it and drop it in the middle of the screen in Experiment area (Number 4)

After putting Module ” Import data” in the experiment, we able to identify the main source of data from variety resources in the cloud and web resources (see below image)
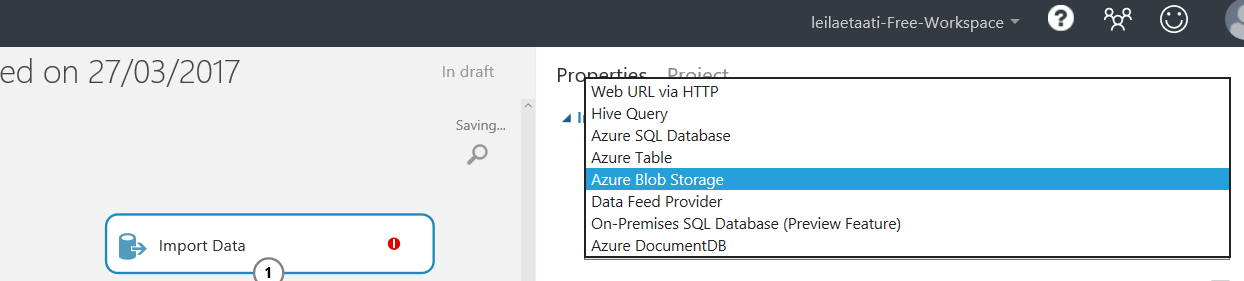
By using “Import data” you able to get data from different resources as has been shown in above image. many of them are part of Azure Cortana suite (Azure Blob, Azure SQL DB, Azure doc, and Azure Table) however there is possibility to import datasets via web url(first option) or from a web service (data feed provider).
For example, I want to import data from a web url : https://vincentarelbundock.github.io/Rdatasets/csv/datasets/AirPassengers.csv. This a CSV file.
First, I click on the Import data module, then in the “data source” I will choose ” Web URL via HTTP” (number 2), following, in the front of the “Data Source URL”, put the web link url . Finally, in “data format” identify the data format as csv (or other format). Then just run the experiment.

After, Running the experiment, you will see a green correct sign will be appear in the front of the module, which shows that we correctly able to import data from web. now by clicking on the node at the bottom of the module (number 1) and then clicking on the “Visualize” option (number 2) you will see the imported dataset.

Imported dataset, has 145 rows (number 1) and 3 columns (number 2). Also, the detail of data has been shown in the middle of screen. Finally, a description of data both from statistic view( number 4) and from visual aspect(number 5) are shown in the right side of the screen. 
I thought these are the main approaches for importing data into Azure Ml. According to machine learning process (Part1) after identifying the source data there is a need to do data wrangling in Azure ML. Hence, in the next part I will explain how to use Azure ML different components for data wrangling.


Waiting for the 3rd Part on Data wrangling
Sure, I will do that, sorry about late response,