Published Date : July 10, 2017
M is the powerful language behind the scene of Power Query. Any transformation you apply will be written in M language. For many, M looks like a scary language. In this post I like to explain a bit of basics of M. Not mentioning any functions. Mainly I want to explain to you how the M language syntax is structured. Once you know the syntax, then everything becomes simple. M is a language that you can learn it’s syntax easily. As a Power Query developer; I highly recommend you to spend time on M, because there are MANY operations that you can with M, but you might not be able to do it simply with the graphical interface. If you would like to learn more about Power BI, read Power BI book from Rookie to Rock Star.
M is informal name of Power Query Formula Language. The formal name is so long that no one uses that, everyone call it M! M stands for Data Mashup, some say stands for Data Modeling. M is a functional language, and it is important to know functions of it. However, each language has a structure and syntax which is the beginner level of learning that language. In this post, I will explain the syntax of M. Before learning M, I would like you to read this sentence loud;
M is much more powerful than the graphical interface of Power Query
Yes, you read it correct! The graphical interface of Power Query is changing every month. Every month new functionality comes to this graphical interface. But the fact is all of these functionalities has been in the language for many years! if you knew the language, you could easily use them, instead of waiting for graphical interface option for it. There are heaps of examples for it. one very small example is here: you can extend your Grouping ability in Power Query with a very minor change in M script of it.
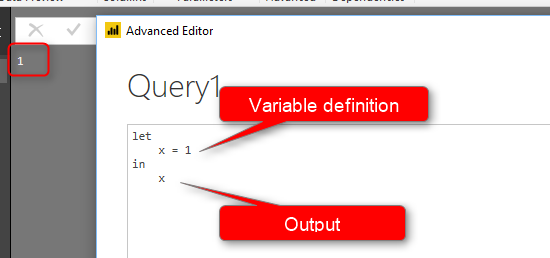
Syntax of this language is simple. it always has two blocks of programming: LET expression block, and IN expression block. Here is the most simple M syntax;
let
    x=1
in
    x
let and in are reserved words. before going even one step further, the first and foremost thing you need to know;
M (Power Query Formula Language) is Case Sensitive. There is a difference between x and X.
what are these two programming blocks:
let: definition of all variables
in: output! Yes, in actually means out! just named as in. everything you put in this block will be the output of your query.
So basically, the query below means defining a variable named as x, assigning the value 1 to it, and showing it as the result set. so the query will return 1.
to run this example, you need to Open Power BI Desktop. Go to Get Data, start with New Blank Query.

then in View tab, select advanced Editor;

Make sure when you write the script that you put reserved words such as let and in all lowercase. also your variable name should be the same case in both let and in section.
As you can see, there is no need to define data types for variable. it will be automatically assigned when the first assignment occurs.
If you specify a text value, then variable would be a text data type automatically.
Lines of codes in M continues if you don’t put the end of the line character.
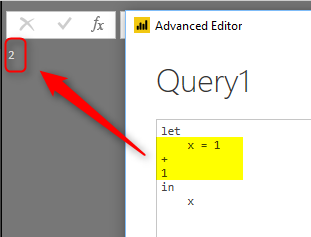
As you can see in above example, the line continues, and x will be equal to x=1+1 . If you want to put an end for a line use comma(,). example here:
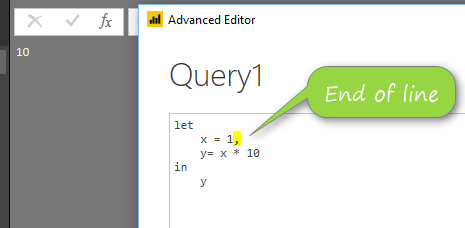
every line needs a comma(,) to finish. except the last line before in.
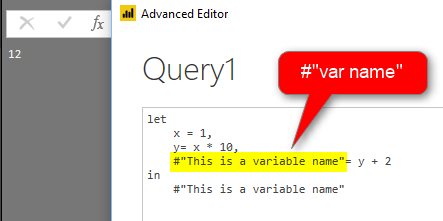
Name of variables can be all one word, like Source. or it can has spaces in it. in case that you have some characters such as space, then you need to put the name inside double quote (“) and put a hashtag at the beginning of it(#). something similar to:
#"This is a variable name"
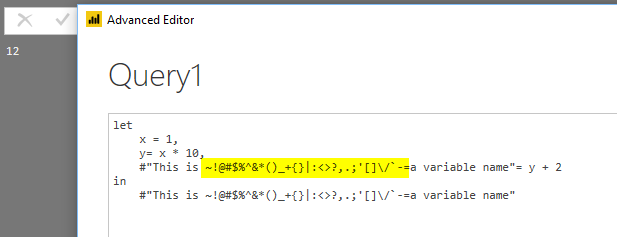
Variable name can contain special characters, here is an example:
Variable names can have special character, as you can see below variable has all types of characters in it and still runs good.
Double quote (“) is escape character. you can use it to define variables with names that has another double quote in it. here is an example:
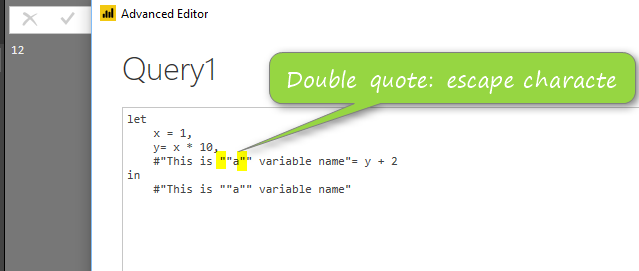
first double quote (highlighted) above is necessary to be before the second double quote (which is part of the variable name).
Power Query is a step by step transformation. Every transformation usually happens in a step. While you are writing the code, you can also notice that in the right hand side, you will see every variable forms a step.

in screenshot above, you can see every variable is determined as a step. and if the variable has space in the name, it will show it with spaces in list of applied steps.
The last variable is always specified in the in section.
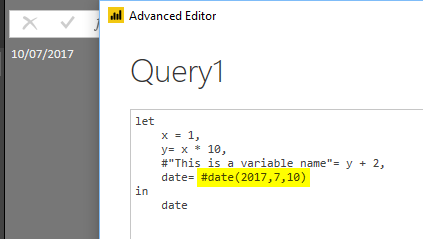
There are different ways of defining every literal in Power Query. For example, if you want to define a date variable, here is how to do it;
for defining all other types of literals, here is the reference table to use:
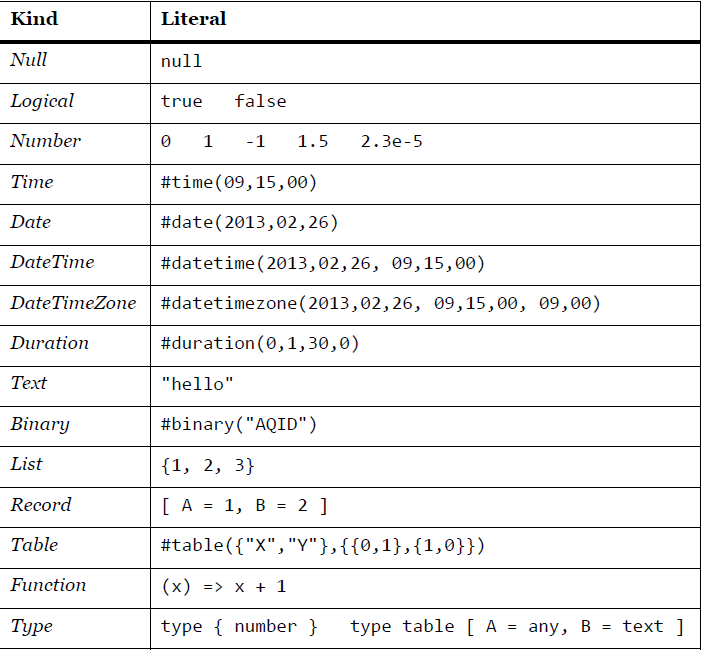
* for function and type; I’ll write another post later to explain how these types works.
M is a functional language, and for doing almost everything you need to call a function for it. functions can be easily called with name of the function and specifying parameters for it.
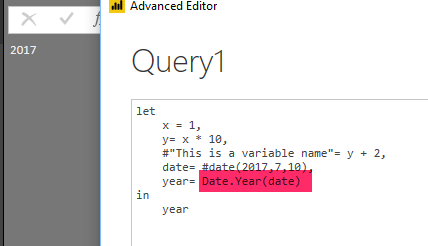
screenshot above uses Date.Year function which fetch year part of a date. Functions names starts always with capital letters: Date.Year()
like any programming language, you can put some comments in your code. it can be in two forms;
Single line commentary with double slash (//)
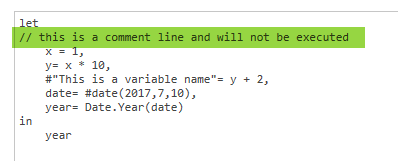
Multi line commentary between slash and starts (/* comments */)

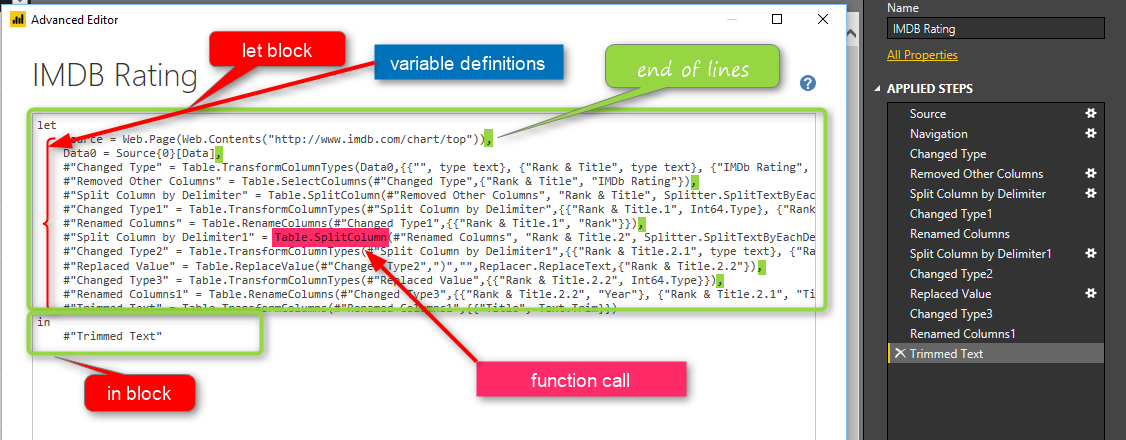
Now that you know some basics, let’s look at an existing query in advanced editor mode and understand it.
in screenshot above, you can see all basics mentioned so far:
There are still many parts of this query that you might not understand. specially when using functions. you need to learn what functions are doing in order to understand the code fully. I have written a blog post, that explains how to use #shared keyword to get documentation of all functions in Power Query.
In next posts, I’ll explain another levels of structures in M.
Published Date : July 6, 2017

New REST API of Power BI is revolutionary. In addition to embedding content in Power BI, ability to refresh data set from API, it also gives you many functions to work with Gateways and Data Sources. With this API, you can set up new data sources, clone data sets, check the credentials of a data source, get list of all data sources under a gateway, and do many other operations. In other words; Data source management can be fully automated with REST API. Continue reading this post if you like to learn more about this. If you like to learn more about Power BI; read Power BI book; from Rookie to Rock Star.
The sample code for this example can be downloaded from here.
List of gateways are accessible through a function under Gateways, called GetGatewaysAsync. you can easly fetch list of gateways (on-premises gateways, not personal), and then loop through these.
var gateways = await client.Gateways.GetGatewaysAsync();
This function as you can see in above code screenshot will give you list of all on-premises data gateways defined under your account. then you can loop through each gateway and get the information of that gateway, for example; name of the gateway, Id of it, and some information such as version.
Here are list of gateways under this Power BI account;
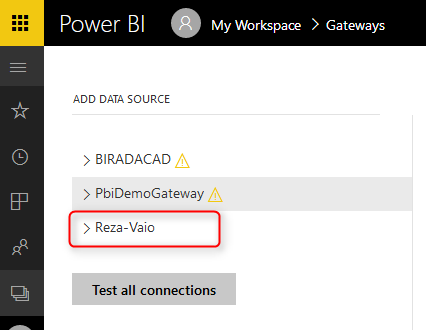
As you can see all of above gateways can be accessed through REST API.
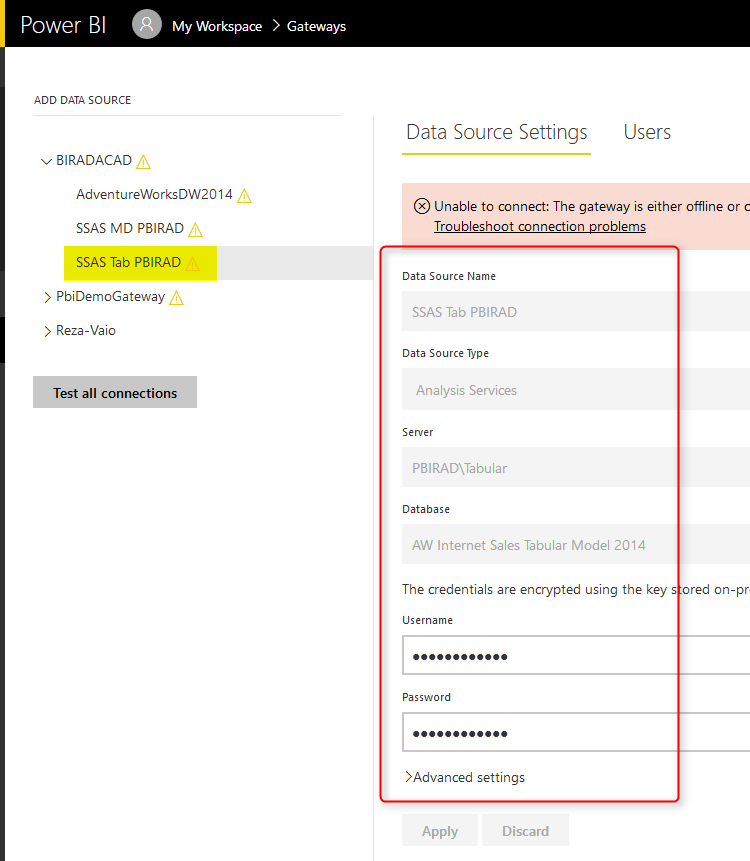
Under a gateway, you can access all data sources with a GetDataSourcesAsync function.
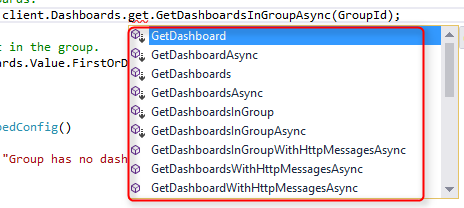
var dashboards = await client.Dashboards.GetDashboardsInGroupAsync(GroupId);
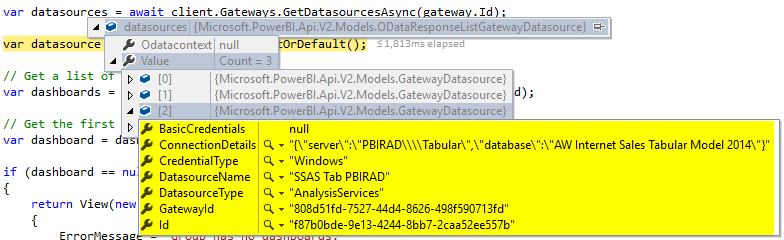
which match exactly the configuration of that data source in the Power BI service
As you can see; there are also properties for accessing the credentials. or even changing it.
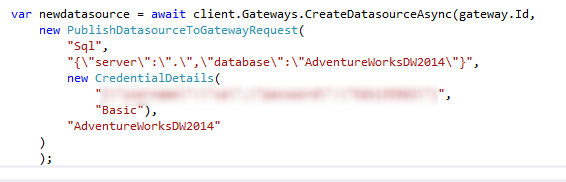
In addition to reading list of data sources, you can do some other operations such as creating a data source, setting up credentials for it. and even binding a data source to a gateway.
There is a function to create data source, called CreateDatasourceAsync. You need to specify data source through a new object of PublishDatasourceToGatewayRequest for that. this object can contain type of data set, and connection information about it including credentials.
after creating the data source, then you can bind a data set to that gateway. For finding the particular data set, please read the previous blog post. when you have the data set key, then you can easily use BindToGatewayInGroupAsync function;
client.Datasets.BindToGatewayInGroupAsync(GroupId, datasetKey, new BindToGatewayRequest(gateway.Id));
There are many other data source and gateway functions that you can use, make sure you explore the REST API and find out more about all functions. Next post will be about posting data rows to a real-time streaming data set through REST API. Stay tuned.
Published Date : June 29, 2017

Power BI REST API is not just for embedding content or getting list of dashboards and reports. It also has many functions to work with data sets, gateways, and data sources. As one of the many exciting features of that; you can easily refresh a data set from an application. you can refresh it as many as times you want. with any frequency you want. You can refresh your data set after ETL run through a console application. or you can have a service application that kick of refresh even every single minute! There is no limitation for your data refresh anymore! Let’s check it out. if you like to learn more about Power BI; read Power BI book; from Rookie to Rock Star.
The sample code for this example can be downloaded from here.
With Power BI REST API version 2, you can access many objects from Power BI service. One of these object types is data set. You can get list of data sets, and you can then apply some operations on it, such as refresh. After authenticating, code below gets list of data sets;
var datasets = await client.Datasets.GetDatasetsInGroupAsync(GroupId);
GetDatasetsInGroupAsync simply gives you a list of all data sets, and you can then iterate through them. As I’ve mentioned before, group id should be the guid of the group. You can then find the particular data set you want. code below just gets the very first data set in the list:
var datasets = await client.Datasets.GetDatasetsInGroupAsync(GroupId);

                var dataset = datasets.Value.FirstOrDefault();

                if (dataset == null)
                {
                    return View(new EmbedConfig()
                    {
                        ErrorMessage = "Group has no datasets."
                    });
                }
This data set is already in a group in my Power BI account;
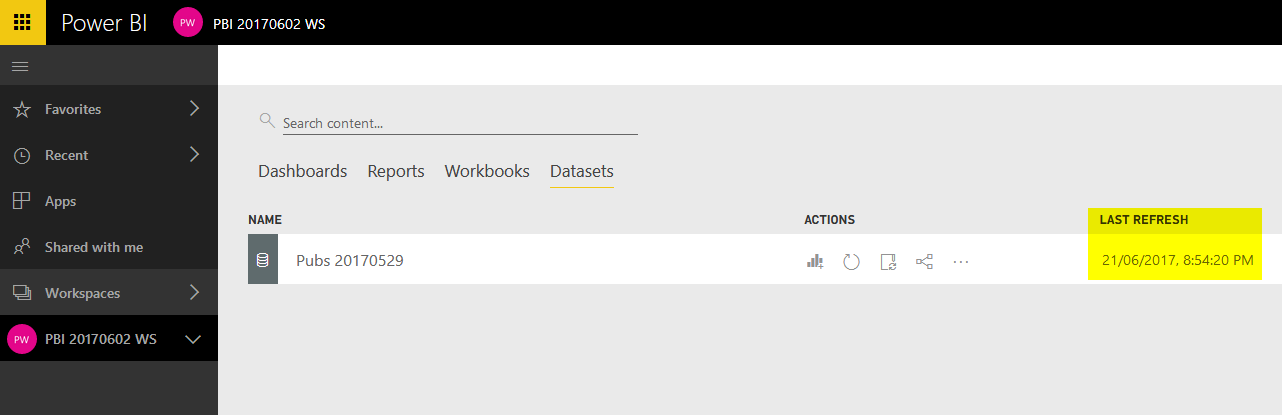
As you can see the data set above, is named Pubs 20170529, and it refreshed at 21st of June 2017 as the last time.
Now with running the code, I can easily find this data set;

After finding the data set, you can easily refresh it.
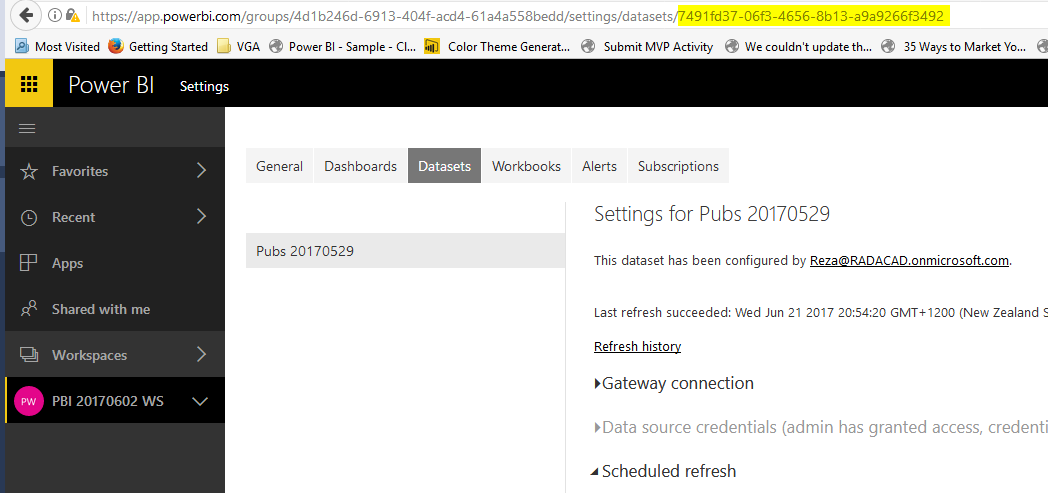
You can even directly refresh a data set, you just need Id of that data set. one way to find the data set ID is through application. another way is from URL of power bi service. If you go to setting of that data set, you can find the ID of it easily;
the code to refresh a data set is very simple:
object result= await client.Datasets.RefreshDatasetInGroupAsync(GroupId, dataset.Id);
As a result of refresh, then you can see the data set is refreshed successfully;
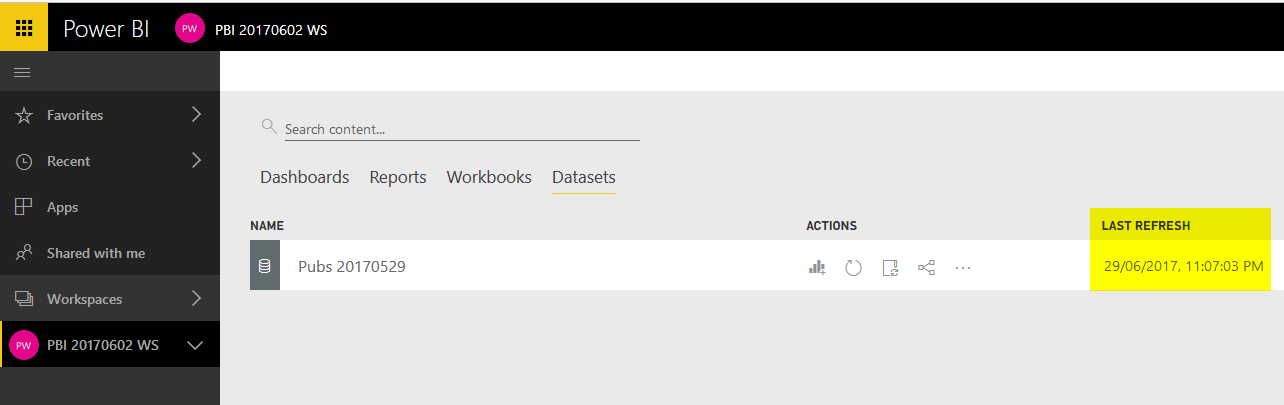
Last refresh time is now 29th of June 2017, 11pm, which is the time of writing this blog post ![]()
Imporatnt note to consider here is that this data set is an IMPORT DATA data set, and it is working through gateway. so I need the gateway to be up and running. However, even if you are connected to a cloud data source through import data, then even without gateway you can refresh the data set. so, any data set can be easily refreshed. the fascinating fact is:
You can refresh your data set from an application. Any time you like, at any frequency you like. After ETL run, or on a schedule basis. This is Refreshing data beyond limits.
The new REST API is an evolution in Power BI integration. You can even read the history of refresh for a data set. Here is the code for it:
var history = await client.Datasets.GetRefreshHistoryInGroupAsync(GroupId, dataset.Id);
Running this code will return the whole history of refresh for that data set. You can easily understand the type of refresh, and time and status of each.
Same refresh history in Power BI service:

This means you can easily write an application that refresh the data set anytime, and also check the history of refresh for troubleshooting.
In the next blog post I’ll explain some of other great features of Power BI REST API, such as managing gateways and data sources.
Published Date : June 28, 2017
In the part 1, you learned how to register an application to be able to interact with Power BI service and Azure environment. In the part 2, you learned how the authentication process works and how you can get the access token. In this part, I’m going to explain what is the process of embedding content (Dashboard, Report, and Tile) into a web page. you will learn about JavaScript part of it, and also the REST API section of it. if you like to learn more about Power BI; read Power BI book; from Rookie to Rock Star.
in this step you will learn about codes and the method to embed the content into your application after registration and authentication of the application.
The sample code for this example can be downloaded from here.
Power BI Client object is the main object needs to be created in order to interact with Power BI Service. As you’ve learned above, you need to have the access token for this step. You just need to parameters to create a Power BI Client object; ApiURL (which is static), and token (which is gained through authentication process mentioned in previous post).
var client = new PowerBIClient(new Uri(ApiUrl), tokenCredentials);
After creating this object, you have access to massive amount of information from Power BI Service, and you can implement many actions through it (Which I explain many of these actions in other posts).
For this example; I’m going to Embed a report into web page, so I will get list of reports first (you can even directly mention the report Id).
// Get a list of reports.
                var reports = await client.Reports.GetReportsInGroupAsync(GroupId);

                // Get the first report in the group.
                var report = reports.Value.FirstOrDefault();

                if (report == null)
                {
                    return View(new EmbedConfig()
                    {
                        ErrorMessage = "Group has no reports."
                    });
                }
As you can see the function used is GetReportsInGroupAsync. This function simply returns all reports under a group. Group Id is specified in web.config file. Notice that Id is not name of the group. the name that you see for group, dashboard, report, and data set, are just display labels. Each object in Power BI has an ID which is a unique identifier (GUID). you can easily find it when you browse the group in Power BI Service through URL;
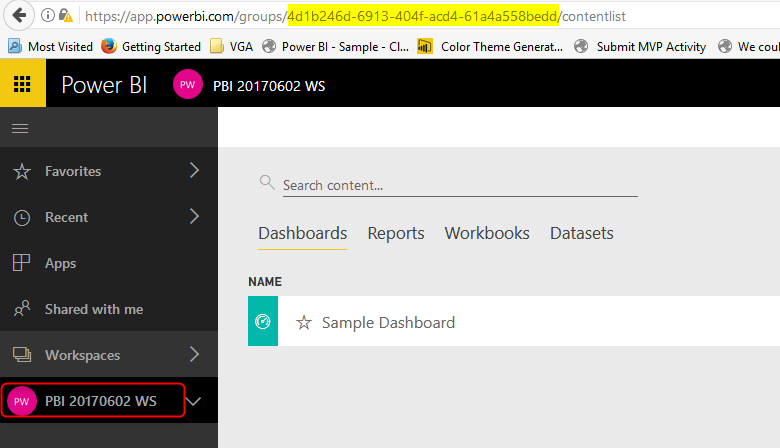
These Ids can then be used for Power BI REST API functions.
Function above will return first report on that list, because I’ve used FirstOrDefault() function. You can easily mention any other reports if you want to.
In the MVC application the next step is to create the embed content and push it to the view. lines below generating the embed content;
// Generate Embed Token.
                var generateTokenRequestParameters = new GenerateTokenRequest(accessLevel: "view");
                var tokenResponse = await client.Reports.GenerateTokenInGroupAsync(GroupId, report.Id, generateTokenRequestParameters);

                if (tokenResponse == null)
                {
                    return View(new EmbedConfig()
                    {
                        ErrorMessage = "Failed to generate embed token."
                    });
                }

                // Generate Embed Configuration.
                var embedConfig = new EmbedConfig()
                {
                    EmbedToken = tokenResponse,
                    EmbedUrl = report.EmbedUrl,
                    Id = report.Id
                };

                return View(embedConfig);
In the EmbedReport.Chtml page which is view web page, you need a JavaScript section to embed the content into the page. here is the JavaScript code;
    // Read embed application token from Model
    var accessToken = "@Model.EmbedToken.Token";

    // Read embed URL from Model
    var embedUrl = "@Html.Raw(Model.EmbedUrl)";

    // Read report Id from Model
    var embedReportId = "@Model.Id";

    // Get models. models contains enums that can be used.
    var models = window['powerbi-client'].models;

    // Embed configuration used to describe the what and how to embed.
    // This object is used when calling powerbi.embed.
    // This also includes settings and options such as filters.
    // You can find more information at https://github.com/Microsoft/PowerBI-JavaScript/wiki/Embed-Configuration-Details.
    var config = {
        type: 'report',
        tokenType: models.TokenType.Embed,
        accessToken: accessToken,
        embedUrl: embedUrl,
        id: embedReportId,
        permissions: models.Permissions.All,
        settings: {
            filterPaneEnabled: true,
            navContentPaneEnabled: true
        }
    };

    // Get a reference to the embedded report HTML element
    var reportContainer = $('#reportContainer')[0];

    // Embed the report and display it within the div container.
    var report = powerbi.embed(reportContainer, config);
As you can see in the above section; Embed Token is required for embedding part again, plus embed content coming from the controller.
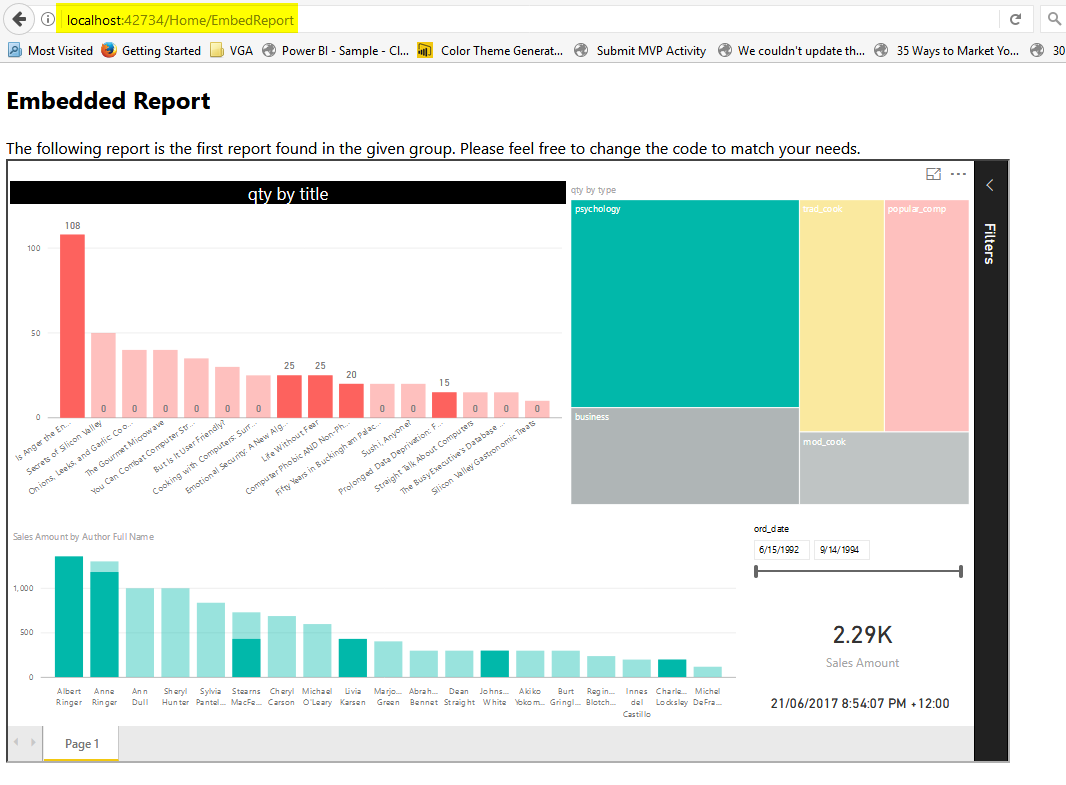
If you run the sample application, you can check and see how embedding Report in application works perfectly;
As you can see, the report is integrated into my application which is running on my localhost. This method of embedding works with any type of report, sourced from any data source with any connection type.
There is a function that returns list of dashboards for you, and you can easily select dashboards you want.
GetDashboardsInGroupAsync, or GetDashboardAsync and many methods as listed below can give you information about dashboards;
After fetching list of dashboards it can then be passed to view with script below;
                // Get a list of dashboards.
                var dashboards = await client.Dashboards.get.GetDashboardsInGroupAsync(GroupId);

                // Get the first report in the group.
                var dashboard = dashboards.Value.FirstOrDefault();

                if (dashboard == null)
                {
                    return View(new EmbedConfig()
                    {
                        ErrorMessage = "Group has no dashboards."
                    });
                }

                // Generate Embed Token.
                var generateTokenRequestParameters = new GenerateTokenRequest(accessLevel: "view");
                var tokenResponse = await client.Dashboards.GenerateTokenInGroupAsync(GroupId, dashboard.Id, generateTokenRequestParameters);

                if (tokenResponse == null)
                {
                    return View(new EmbedConfig()
                    {
                        ErrorMessage = "Failed to generate embed token."
                    });
                }

                // Generate Embed Configuration.
                var embedConfig = new EmbedConfig()
                {
                    EmbedToken = tokenResponse,
                    EmbedUrl = dashboard.EmbedUrl,
                    Id = dashboard.Id
                };

                return View(embedConfig);
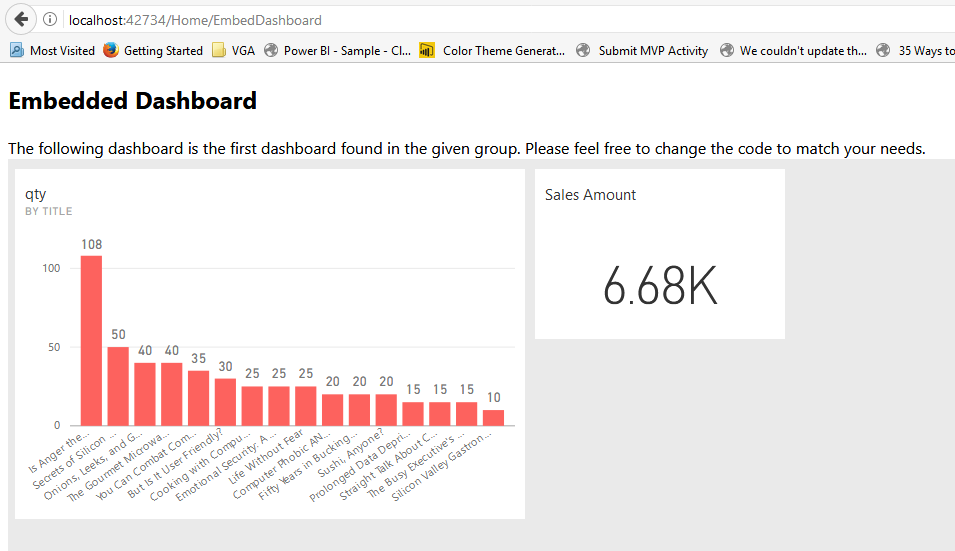
Finally embedding dashboard is similar to embedding report, with slight difference;
    // Read embed application token from Model
    var accessToken = "@Model.EmbedToken.Token";

    // Read embed URL from Model
    var embedUrl = "@Html.Raw(Model.EmbedUrl)";

    // Read dashboard Id from Model
    var embedDashboardId = "@Model.Id";

    // Get models. models contains enums that can be used.
    var models = window['powerbi-client'].models;

    // Embed configuration used to describe the what and how to embed.
    // This object is used when calling powerbi.embed.
    // This also includes settings and options such as filters.
    // You can find more information at https://github.com/Microsoft/PowerBI-JavaScript/wiki/Embed-Configuration-Details.
    var config = {
        type: 'dashboard',
        tokenType: models.TokenType.Embed,
        accessToken: accessToken,
        embedUrl: embedUrl,
        id: embedDashboardId
    };

    // Get a reference to the embedded dashboard HTML element
    var dashboardContainer = $('#dashboardContainer')[0];

    // Embed the dashboard and display it within the div container.
    var dashboard = powerbi.embed(dashboardContainer, config);
so as a result this is the embedded dashboard;
You first need to have the dashboard object in order to get tiles under it.
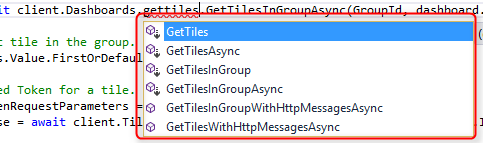
As you can see above there are some functions that fetch Tiles from Dashboard and group. Code below will fetch first tile in a dashboard and pass it to the view page.
                var tiles = await client.Dashboards.GetTilesInGroupAsync(GroupId, dashboard.Id);

                // Get the first tile in the group.
                var tile = tiles.Value.FirstOrDefault();

                // Generate Embed Token for a tile.
                var generateTokenRequestParameters = new GenerateTokenRequest(accessLevel: "view");
                var tokenResponse = await client.Tiles.GenerateTokenInGroupAsync(GroupId, dashboard.Id, tile.Id, generateTokenRequestParameters);

                if (tokenResponse == null)
                {
                    return View(new TileEmbedConfig()
                    {
                        ErrorMessage = "Failed to generate embed token."
                    });
                }

                // Generate Embed Configuration.
                var embedConfig = new TileEmbedConfig()
                {
                    EmbedToken = tokenResponse,
                    EmbedUrl = tile.EmbedUrl,
                    Id = tile.Id,
                    dashboardId = dashboard.Id
                };

                return View(embedConfig);
Very important consideration of the new REST API way of integrating Power BI content is that, now you can embed any type of content: Dashboard, Report, and Tile. Your data set can be connected to any data set, online or on-premises, import data or DirectQuery. With this method of integration, you can integrate anything that you have in Power BI account easily into your application. I will explain another post later about FAQs of such integration plan. Stay tuned for next blog posts from this series.
Published Date : June 27, 2017

In the part 1, you learned how to register an application to be able to interact with Power BI service and Azure environment. In this part, I’m going to explain what is the process involved after that in order to authenticate through your application into Azure Active Directory. This step is important step before doing any work with Power BI REST API, after completing this step, you can then create a Power BI client object that can be used for embedding Power BI content, data source and gateway management, and all other operations with Power BI objects. if you like to learn more about Power BI; read Power BI book; from Rookie to Rock Star.
Every application which want to interact with Azure environment, should go through an authentication process. This authentication process is passing Client ID (and sometimes Client Secret) to Azure, and getting an authentication code. From this authentication code, and access Token can be fetched. This access token is a property that should be involved in every request sent from your application to Power BI and Azure afterwards. Without this access token your requests will fail.
As mentioned above, you need to get the access token in order to interact with Power BI REST API. This access token can be fetched through a process of authentication with Azure. the process itself, requires a full blog post at least to explain. below is the flow diagram of the process;
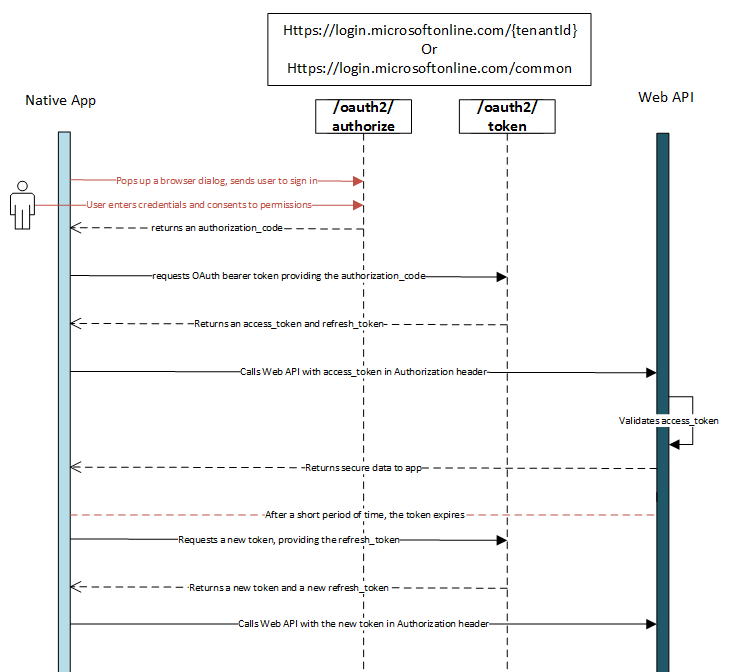
I’m not going to explain details of this flow in this post. If you are interested in that details, read this document.
In this post, I only show you few lines of code, that do this for you.
The sample code for this example can be downloaded from here.
After opening the sample code above, go to Web.Config file

In the web.config file, you will see some settings such as ApiURL, and EmbedURL, and some other configurations. Leave these as is. Just put your CLIENT ID there (the one you’ve got from previous step of registering your application). For this example you don’t need Client Secret. Also you need to specify your Power BI username and password, make sure that these are saved from a secure place, and fetched from there.
The sample application used here is an MVC application which has three layers; Model, View, and Controller. I’m not going to explain details of that, you need to read a book to understand how MVC works. In a very basic definition; View is presentation layer, Controller is business layer and code logic, and Model is the content passed from Controller to View. Authentication process and getting Access Token in this scenario happens in controller.
If you open HomeController.cs under Controllers folder, then you will find the first method EmbedReport(), which is doing the authentication process in very first few lines;
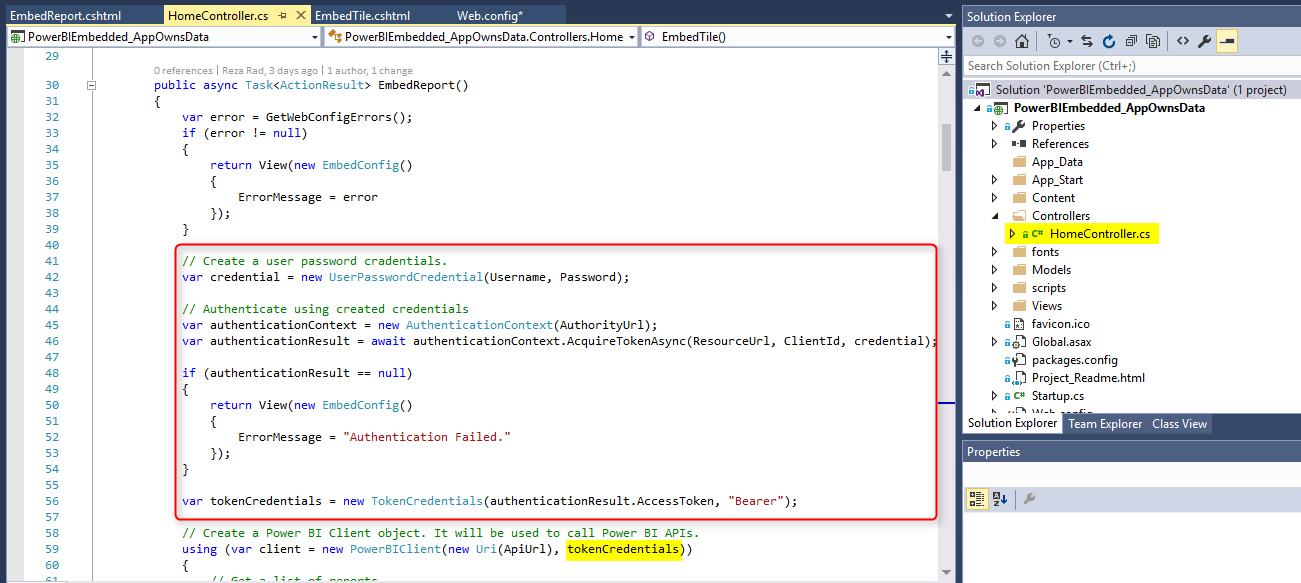
Authentication process in general includes, passing credentials to AuthorityURL, and getting the result back, if application has the access, and authentication goes through correctly, then you will get a result which you can fetch Token from it. The token then will be used in creating a new instance of Power BI Client. Power BI Client is the main object that should be created from REST API in order to interact with Power BI service.
Power BI Client object is the main object needs to be created in order to interact with Power BI Service. As you’ve learned above, you need to have the access token for this step. You just need to parameters to create a Power BI Client object; ApiURL (which is static), and token (which is gained through authentication process above).
var client = new PowerBIClient(new Uri(ApiUrl), tokenCredentials);
After creating this object, you have access to massive amount of information from Power BI Service, and you can implement many actions through it (Which I explain many of these actions in other posts).
After creating Power BI client object, you can do massive operations with it; embedding content into an application, refreshing data set, data source and gateway management, and many other operations. Read next upcoming posts to learn more details about it.
Published Date : June 26, 2017

Power BI Embedded, which I have written about it previously, brings the power of Power BI into your application. Power BI Embedded Recently had major changes. If you remember from my previous post, there were many limitations in the type of content you can embed into your application and the ways of interacting with it, and even in licensing. Now with new version of REST API for Power BI, everything changed. However, changes are in a good way; you gain more, loose nothing! This blog post series is about new way of integrating Power BI report into your application and reveals some of the questions you might have in this path. if you like to learn more about Power BI; read Power BI book; from Rookie to Rock Star.
Previously, if you wanted to embed Power BI content into your application, you could. However, you could only do that for Power BI reports with DirectQuery connection to Azure SQL Database. Every other type of data source was not supported! This was the main barrier for everyone wanted to use this service. Difficulty in provisioning the content was another problem. With previous version of Power BI embedded, you couldn’t use the content published in Power BI website. You needed to publish content separately into different location (Azure Power BI Embedded Workspace). With previous method you could not embed dashboards or tiles, it was just reports. Licensing plan for Power BI Embedded was another issue; totally unpredictable.
New way of integrating Power BI into your application is so powerful and fascinating, that it doesn’t even bring the name of embedded with it. it is more like integration. That’s why many people call it Integrating Content into Power BI. with the new way; you can bring any content (Power BI Dashboard, Tile, and Report) into your application. Content can be sourced from ANY type of data sources, it can be import data or LiveQuery or DirectQuery, it can use Gateways or get it from cloud data sources. You can easily integrate the same content which is published into Power BI service. and the licensing plan is different, more predictable I’d say.
Let’s take a look at this new way in a blog post series, starting from this one.
The sample code for this example can be downloaded from here. This sample code won’t be used in this particular post, but next posts after this will need it.
In this post I will be using Power BI REST API which is at the moment version 2. If you download the sample code above, then you don’t need to download API separately. However, if you are starting a new project, you can go to Nugget Manager in Visual Studio and search for Power BI REST API.
The new version of Power BI REST API has MANY features, which I will talk about them in a series of blog posts. In fact, features are so much that cannot fit into few posts. So, stay tuned for lots of upcoming posts about it. In this post I’ll focus on few functionalities that is useful for integrating report into your application.
First step is to register your application. What does that mean? Any application which wants to interact with Azure should be registered, and authorized through a process. To register your application there are two ways; one is simpler to start, the other one is simpler to maintain ![]()
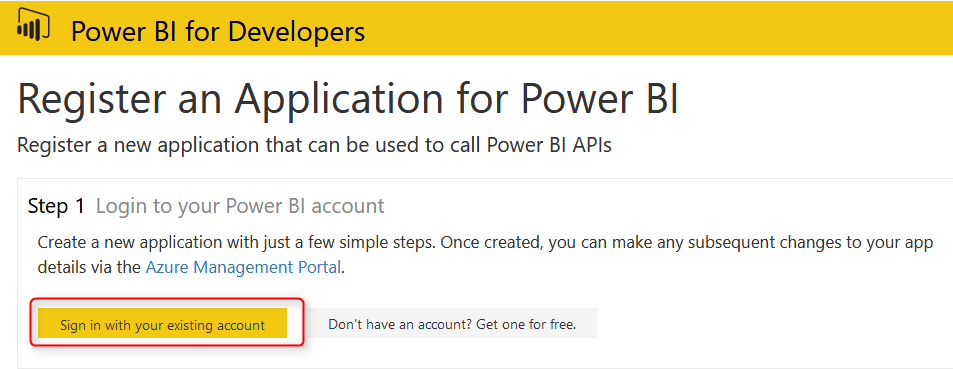
Go to this website, and register your application from there. it is a very easy process, let’s have a look. Login with your Power BI account first;
After signing in, you can specify a name for your application (just to be able to find it easier in a list of applications). also select the application type.
There are two types of applications: Server-side web app, and Native app. what is the difference?
Types of Integrating Power BI Content into your application
Before selecting the right application type, you need to understand that there are two types of integrating Power BI content into an application:
In this example we are talking about integration WITH a Token.
Very Important: If you are using the method of integration “With a Token”, then no matter what type of application you are writing. You have to choose Native App from the type of application above, even if you have a web/mobile application.
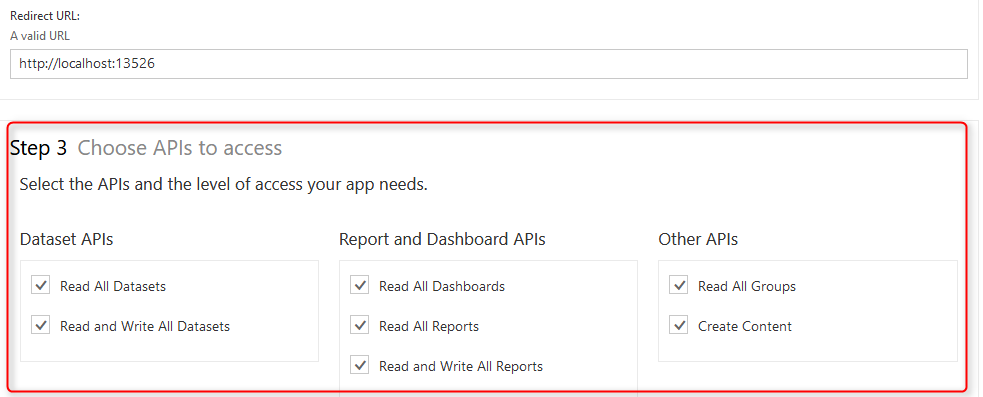
After selecting Native app, then set a redirect URL. For this example, you can simply set it to be: http://localhost:13526
This redirect URL is not that much important, later in future posts I’ll explain about it. You can even set it to be other URLs.
Next step is to decide what permissions you want for this application. As you can see in below image, there are different levels of permissions you can apply. It is not usually good idea to give full permission to an application, however for the test purpose you can select all permissions in below list. For this example you might only need Read All Reports.
Register your application
Last step in this section is to click on Register your application, you will get a Client ID.
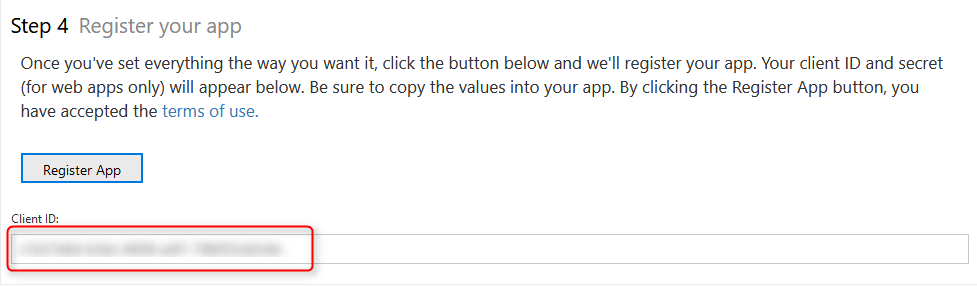
If you register a server-side app, you will also receive a client Secret along with client ID. Client ID (and Client Secret), are important factors for your application to be able to interact with Azure and Power BI service.
Another method of registering application is through Azure Portal. Go to http://portal.azure.com, for this way of registration. The previous method of registration is easier and more user friendly. This method is much better for maintaining an application. With previous method, there is no way of maintaining an application. you can only initiate registration from there. If you want to change permissions or anything related to the application later on, the only way is through this method: Azure Portal.
In Azure portal, go to Azure Active Directory;
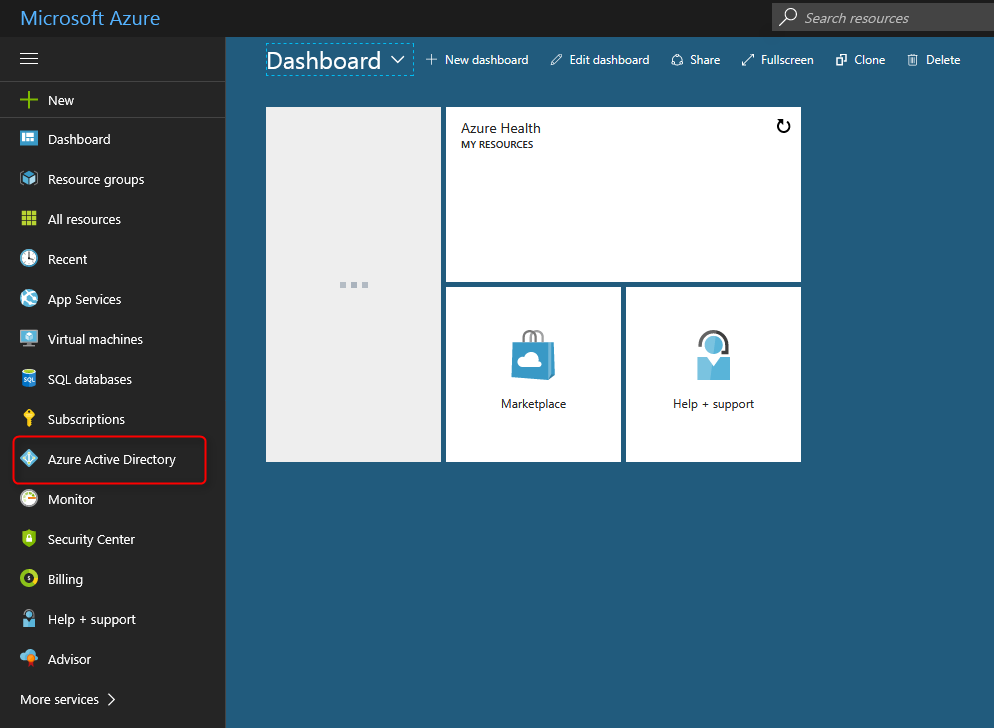
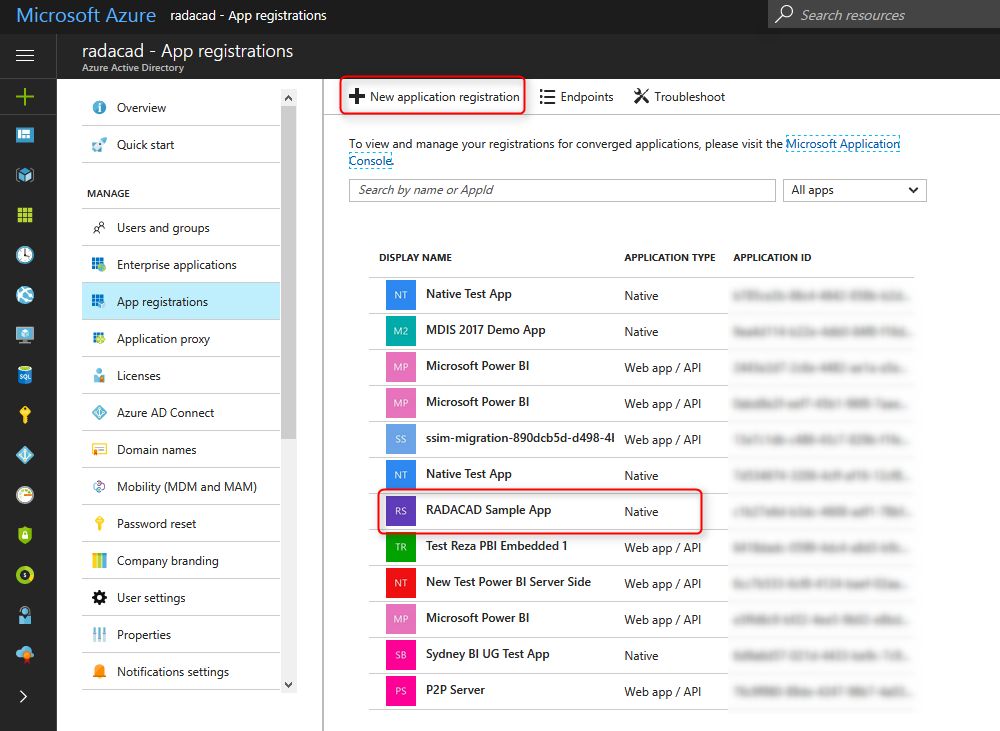
Then go to App Registrations

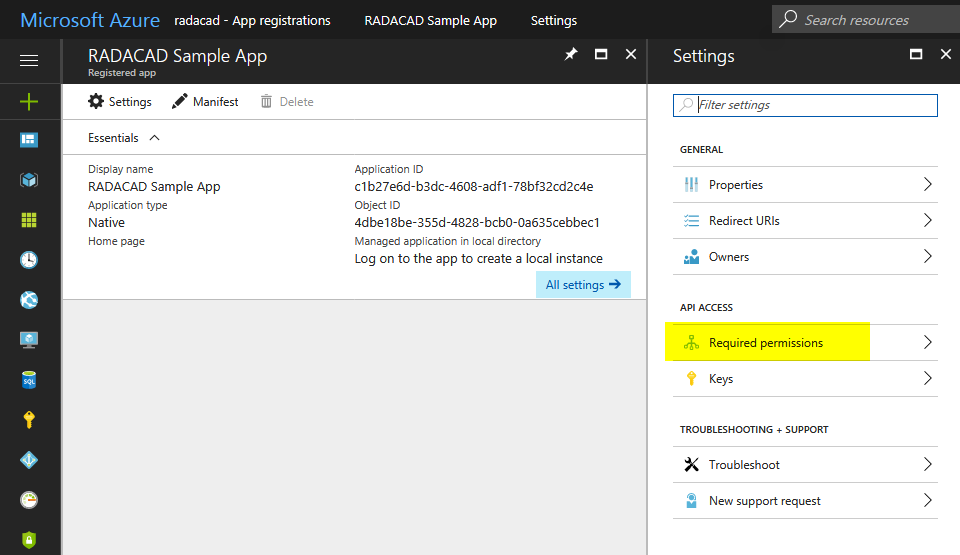
Here you can register your application. or you can even find your existing application. screenshot below shows the RADACAD Sample Application I have registered above;
After selecting the application, you can go to Required Permissions to set up permissions for this app.
For Power BI apps you will find two sets of Permissions; for Power BI, and for Azure Active Directory. after selecting the set, then you can select permissions required, then save. Don’t forget to click on Grant Permissions after that, otherwise permissions won’t be granted!

You can check permissions assigned then in the list later if you want.

Process of registering your application is done, now the next step is to start scripting and coding of your application with Power BI REST API.