
A couple of months ago, I’ve written a blog post about Basics of M and explained few basics about this language. In this post, I’m going to the next step and will explain few other structure definitions in this language. In this post, you will learn about Tables, Records, Lists, and how to navigate through structures. These structures are main value structures in Power Query and M. Every data value in Power Query is in one of these value structures and it is important that you have the ability to work with these structures. To learn more about Power BI; read Power BI book from Rookie to Rock Star.
Prerequisite
To understand parts of code from this post, you might need to first read Basics of M post.
Five Main Value Structures in Power Query
Power Query has 5 structures for values. Data is either in one of these 5 structure types. By structure type, I don’t mean the data type. I mean the way that data is stored. sometimes data stored as a simple value like text, date, or number. Sometimes it is a complex value like a table, record, list, or function.
Primitive Value
Any single part data type considered as a primitive value. examples:
12 – number value
“text sample” – text value
2017/09/21 – date value
null – null value
List
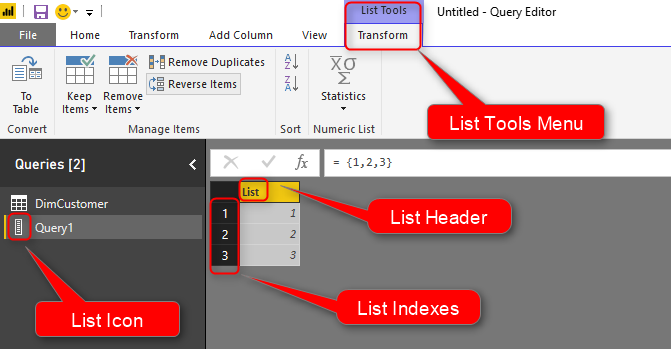
A list is a structure that has only one column, but multiple rows. each row identified with an index. example of a list in Power Query window;

The M script to define a list is as below;
Source = {1,2,3}
List Definition is always started with { and ends with }, items placed in between with a comma separator;
List = {<item 1>,<item 2>,<item 3>}
There are some ways to understand if a structure is a list or not. in screenshot below all mentioned;
- List Icon: There will be a specific icon for the list in the Queries pane.
- List Tools: When you select a list, you will see List Tools menu. This menu gives you some options later on for changing and transforming the list.
- List Header: At the top of the list column, you will see “List” name.
- List Indexes: Every row in the list should have a numeric index starts from zero.
a list can have items that are totally different in data types. here is an example;
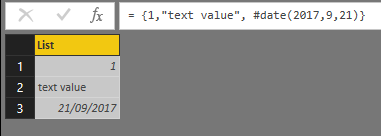
Here is the line definition for this list;
Source = {1,"text value", #date(2017,9,21)}
Record
A record is a structure with a single row, but multiple columns. However, the way that record is showed in Query editor is vertical! The main reason is that scrolling to right is always harder than scrolling to down. So, Record is only visualized in a similar way to list, however, it is totally different structure. This is how a record looks like in Power Query;

As you can see the record showed in a vertical way, but every column header is visible there.
Here is the script for defining the record;
Source = [Column 1=1,Column 2=2]
Record definition always starts with [ and ends with ]. for every column you will have the column name before = sign, and the value of that after the = sign.
Record = [ Column 1 = <value>, Column 2 = <value> ]
Screenshot below shows how you can identify that the structure is a record;
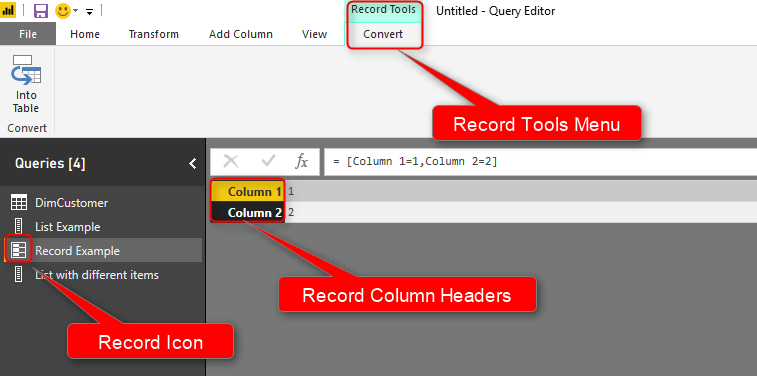
- Record Icon: There is a specific Icon that determines the object is a Record.
- Record Column Headers: You can see column headers in the record. In a list, you can see only numbers, but in a record, you see column names.
- Record Tools Menu: Every time you select a record object, you will see Record Tools which gives you the option to convert it to a table.
A record also can have different types of items. It is actually different columns.

Here is the definition of the record above;
Source = [Column Text="text value", Column Number=12]
Table
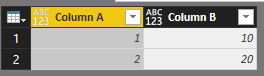
A table is a structure that is most well known among others. a table simply is a combination of multiple rows and multiple columns. Here is a table sample;
To create a table through M script, you can run a script such as below;
Source = #table(
{"Column A","Column B"},
{
{1,10},
{2,20}
}
)
Table definition always starts with #table, then inside the bracket, you have to set of brackets; one set for defining headers, and the other set for all row values. Here is how this works;
Source = #table(
{"Column A","Column B"}, // all column headers
{ // start of row values
{1,10}, // row one
{2,20}  // row two
} // end of row values
)
If you see a table, then you can recognize it immediately. because the table is the only structure that has multiple rows and multiple columns in it.
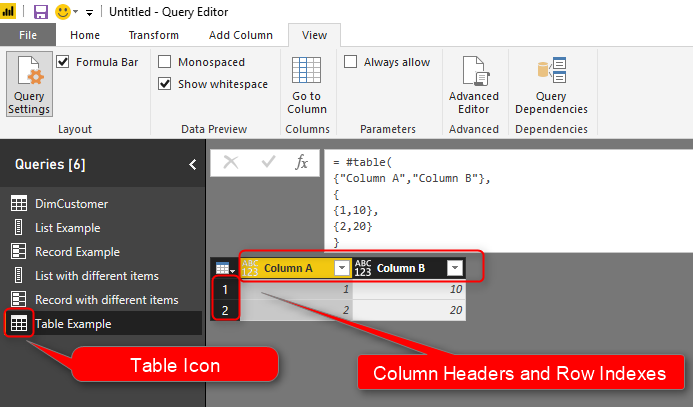
Table Icons shows that this is a table, and multiple columns and rows are only possible in a table.
You can also have a table with different items in each cell.
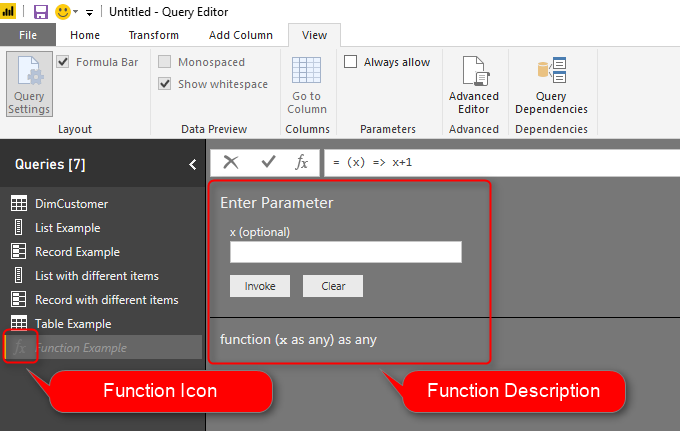
Function
A function is a data type that performs an operation and gives you a result. Here is an example of how function looks like in the query editor window;

Function can be defined based on Lambda language as below;
Source = (x) => x+1
Function Definition has many details in it. I’ll talk about it separately in another post. For now, just knowing this is enough that function has an input and output. input and output are separated from each other with => signs.
Source = (<input of function>) => <output of function>
You can easily understand a function based on its specific icon, and also the function call dialog box.
A function is one of the most powerful features in Power Query, and can’t be explained only in few paragraphs. Stay tuned, and I’ll write more details about functions in other posts separately.
Navigating Through List
Now that you know what list is, and how to define it, let’s look at how you can navigate through the list. Each list item has a row index. you can easily navigate to that item using that index.
let
    Source = {1,2,3},
    Source1 = Source{1}
in
    Source1
For navigating through a list, simply use a bracket and put the index of the item in the bracket. Now here is the tricky part:
Index starts from zero
When you look at the list in query editor window, the index starts from 1. However, the actual index starts from zero. so if you want to drill down to a specific item in the list, you have to use a zero-based index to get to that. The example above will navigate to the second item in the list.
So this is simply the syntax to navigate through the list;
List{<item index starting from zero>}
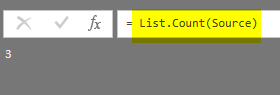
List Functions
There are also a number of functions that work on a list. For example, you can get the count of items in a list, with List.Count() function.
I will write more about List functions in the future separately.
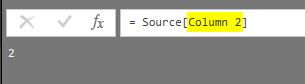
Navigating Through Record
To navigate through a record, you need to use the column name for that record.
let
    Source = [Column 1=1,Column 2=2],
    #"Column 2" = Source[Column 2]
in
    #"Column 2"
You can simply put the column name inside bracket [ and ], and as a result, you will have the item;
Record Functions
The Record also has a lot of functions. For example, you can use Record.FieldCount() to get the count of columns in a record.

I will write another post about functions for Record.
Navigating Through Table
Navigating through a table happens a lot in real world scenarios when you want to drill down into a specific area of the table. for the table, you can use different methods to navigate;
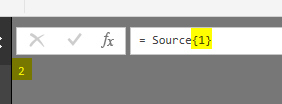
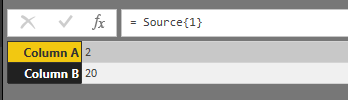
Navigate with Record Index: Drill Down to Record
You can navigate to any records in the table simply with putting the record’s index (zero-based) inside { and }. Here is an example;
let
    Source = #table(
{"Column A","Column B"},
{
{1,10},
{2,20}
}
),
record=Source{1}
in
    record
This would bring the second row of the table as a Record structure;
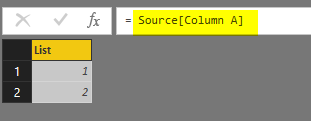
Navigate with Column Name: Drill Down to List
You can also fetch every column of the table with referring to that column name inside [ and ]. The result would be a list.
let
    Source = #table(
{"Column A","Column B"},
{
{1,10},
{2,20}
}
),
    #"Column A" = Source[Column A]
in
    #"Column A"
Navigating to a column will result in a list;
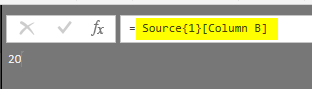
Navigate with Row Index and Column Name: Drill Down to individual Value
Sometimes you want to drill down to a specific cell, for that you need row index (zero-based), and column name both.
let
    Source = #table(
{"Column A","Column B"},
{
{1,10},
{2,20}
}
),
    #"Column B" = Source{1}[Column B]
in
    #"Column B"
The script above navigates to the second row (Index 1 belongs to the second row) and column B. Result would be a primitive value in this case;
You can also do this navigation the other way around. navigate to column first, and then to row. an example below;

Navigate with Filter Criteria
For the majority of the cases, you want to navigate based on criteria. For example, you want to get the Column B value of the row that Column A value for that row is something specific. Like writing a SQL Statement clause. in the table below. for example; we want to navigate to the column B where column A is 1. You cannot do that search based on an index. However, you can search based on criteria.
in the table below. for example; we want to navigate to the column B where column A is 1. You cannot do that search based on an index. However, you can search based on criteria.
Here is how you can search;
let
    Source = #table(
{"Column A","Column B"},
{
{1,10},
{2,20}
}
),
filtered=Source{[Column A=1]}[Column B]
in
    filtered
The result would be 10 as expected;
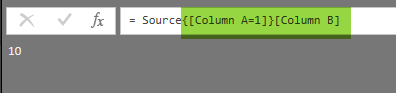
The structure simply is as below;
= <Table Name>{[Column Name="criteria 1", Column Name="criteria 2"]}[Output Column]
This is similar to SQL Where and Select Clause.
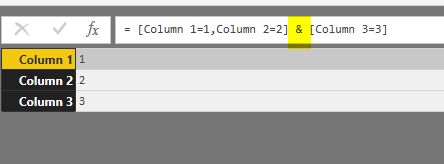
Concatenate List or Records
You can concatenate list or records together with ampersand (&) character. Here is an example for list concatenation;

and here is an example for record concatenation;
For concatenating tables; you need to use either Append or Merge. I explained fully in details about Append and Merge in this post.
Summary
In this post, you learned some of the basics about different value structures in Power BI; Primitive values, list, record, table, and function. You learned how to navigate through list, record, and table with different methods with M script. In future posts, I’ll explain more details about each value structure and functions related to that structure.


Reza is author of more than 14 books on Microsoft Business Intelligence, most of these books are published under Power BI category. Among these are books such as Power BI DAX Simplified, Pro Power BI Architecture, Power BI from Rookie to Rock Star, Power Query books series, Row-Level Security in Power BI and etc.
He is an International Speaker in Microsoft Ignite, Microsoft Business Applications Summit, Data Insight Summit, PASS Summit, SQL Saturday and SQL user groups. And He is a Microsoft Certified Trainer.
Reza’s passion is to help you find the best data solution, he is Data enthusiast.
His articles on different aspects of technologies, especially on MS BI, can be found on his blog: https://radacad.com/blog.