

In step 1 of creating date dimension I explained how to create the base query with calendar columns. In this post I will explain how to add fiscal columns calculated in the date dimension. Many of business reports generates on fiscal year, fiscal quarter, and fiscal period, so having fiscal columns is important part of a date dimension. For creating the calculation for fiscal columns, I will use generic calculations that works perfectly for all scenarios (when you have any particular month as start of fiscal year). To learn more about Power BI; read Power BI book from Rookie to Rock Star.
Prerequisite
For this post you need to complete the step 1 of creating date dimension.
Parameter for Fiscal Year Star
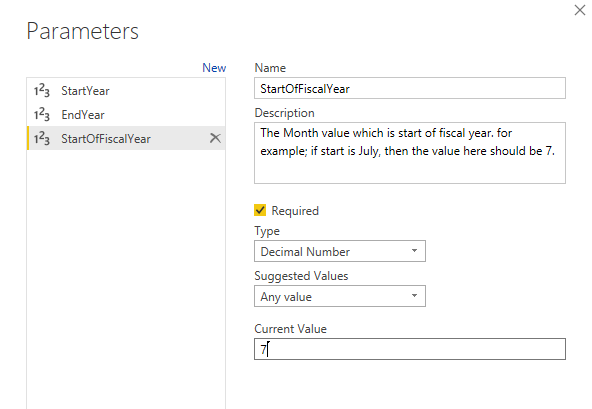
Because I want the configuration to be dynamic, and I want to be able to change the fiscal year start to any month and it works perfectly fine, so I am going to create a parameter for fiscal year start. In Query Editor, create a new parameter. Name it StarOfFiscalYear. this will hold the month value which is start of fiscal year.
After creating the parameter, then we can start applying the logic for every fiscal column as a new custom column.
Creating Fiscal Columns
We do not have built-in functions to calculate fiscal columns. However, calculations are easy. We will go through it one by one, and you will see how the logic can be implemented.
Fiscal Year
The first and easiest one is to calculate Fiscal year. Consider that months 7 (July) is start of fiscal year, then we should have this;
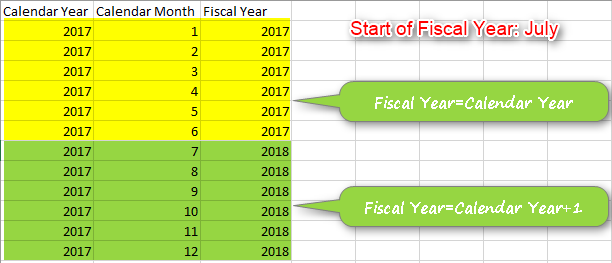
As you can see in the image above; June 2017 considered as fiscal year 2017. However, July 2017 is part of fiscal year 2018. So the simple logic can be like this:
if (calendar month >= fiscal year start)
then fiscal year = calendar year
else fiscal year = calendar year + 1
This code is pseudo code. don’t write that exactly in M! Let’s now implement it in M;
Create a Custom column in Date Dimension Query (I’ve explained how to create that query in previous post),
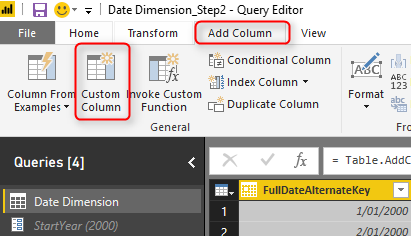
In a custom column you can write your M code as below;
if [Month]>=StartOfFiscalYear
then [Year]+1
else [Year]

This is the M version of the same logic you’ve learned above.
After creating every custom column, make sure that you change its data type to proper one. for this; change it to Whole Number.
Fiscal Period or Month
calculating fiscal period or month is following the same IF expression logic. but different calculation this time. here are some samples;

So as an example; June 2017 is Fiscal period 12 of the fiscal year 2017. July 2017 is fiscal period 1 of the fiscal year 2018. As you can see the logic above; if calendar month is before fiscal year start month, then we add 6 to the calendar month to get the fiscal year, otherwise; we’ll reduce 6 from it.
What is 6? where this value is coming from? let’s look at another example;
In this example; assume start of fiscal year is April (month 4);
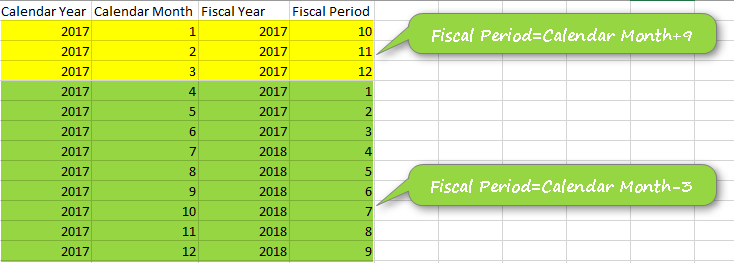
Well, that made it more difficult. Didn’t? now we have two numbers; sometimes plus 9, sometimes minus 3! Don’t be afraid the logic is simple. Here it is the logic;
If the calendar month is greater than or equal to fiscal year start, then we can simply say; Calendar Month – (Fiscal Year Start – 1)
if otherwise; we can say; Calendar Month + (12 – Fiscal Year Start + 1)
So, is how to implement it;
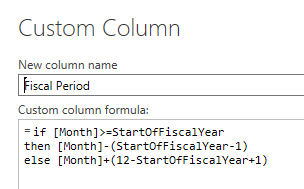
Create a new Custom Column for Fiscal Period. put the code below there;
if [Month]>=StartOfFiscalYear
then [Month]-(StartOfFiscalYear-1)
else [Month]+(12-StartOfFiscalYear+1)
Fiscal Quarter
Calculating fiscal quarter should be easy when you have the fiscal period. You can start with dividing by 3. Then Round the value Up to get the fiscal quarter. Here is how to do it;
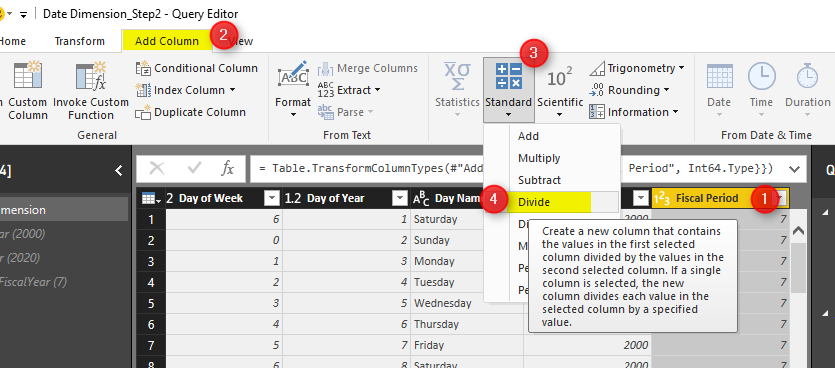
Click on Fiscal Period Column (calculated from previous step), then go to Add Column, from Number Column, select Divide under Standard;
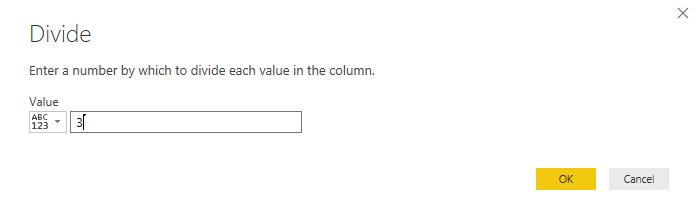
Divide it by 3 (number of months in each quarter);
Result will be a column with values that in some cells has decimal places. we need to Round Up this. Click on this column, go to Transform tab, under Number transformation from Rounding, select Round Up.
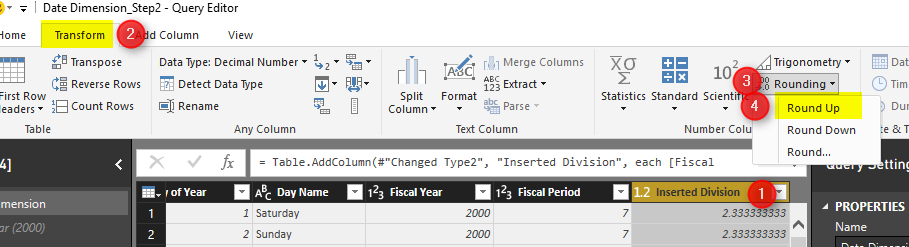
Note that this last transformation is coming from Transform Tab to avoid extra column creation. after this change, then rename the column to Fiscal Quarter;
Fiscal Week
Fiscal week calculation is a bit different from other calculations. Not all business work on fiscal week basis, for example a business on football league or sports league would work on a week basis. This has some varieties. one of them is that a business can say their fiscal year starts at the very first Monday of July each year. another company might say they have a per-defined date as the start of fiscal year. So, depends on the business, the logic is different. The example that I showed you so far is a generic example. Because Fiscal week calculation itself is quite a bit of topic. I’m going to explain that in another post.
Code of this example
The whole script of M for Date dimension in this example is as below;
let
    StartDate = #date(StartYear,1,1),
    EndDate = #date(EndYear,12,31),
    NumberOfDays = Duration.Days( EndDate - StartDate ),
    Dates = List.Dates(StartDate, NumberOfDays+1, #duration(1,0,0,0)),
    #"Converted to Table" = Table.FromList(Dates, Splitter.SplitByNothing(), null, null, ExtraValues.Error),
    #"Renamed Columns" = Table.RenameColumns(#"Converted to Table",{{"Column1", "FullDateAlternateKey"}}),
    #"Changed Type" = Table.TransformColumnTypes(#"Renamed Columns",{{"FullDateAlternateKey", type date}}),
    #"Inserted Year" = Table.AddColumn(#"Changed Type", "Year", each Date.Year([FullDateAlternateKey]), type number),
    #"Inserted Month" = Table.AddColumn(#"Inserted Year", "Month", each Date.Month([FullDateAlternateKey]), type number),
    #"Inserted Month Name" = Table.AddColumn(#"Inserted Month", "Month Name", each Date.MonthName([FullDateAlternateKey]), type text),
    #"Inserted Quarter" = Table.AddColumn(#"Inserted Month Name", "Quarter", each Date.QuarterOfYear([FullDateAlternateKey]), type number),
    #"Inserted Week of Year" = Table.AddColumn(#"Inserted Quarter", "Week of Year", each Date.WeekOfYear([FullDateAlternateKey]), type number),
    #"Inserted Week of Month" = Table.AddColumn(#"Inserted Week of Year", "Week of Month", each Date.WeekOfMonth([FullDateAlternateKey]), type number),
    #"Inserted Day" = Table.AddColumn(#"Inserted Week of Month", "Day", each Date.Day([FullDateAlternateKey]), type number),
    #"Inserted Day of Week" = Table.AddColumn(#"Inserted Day", "Day of Week", each Date.DayOfWeek([FullDateAlternateKey]), type number),
    #"Inserted Day of Year" = Table.AddColumn(#"Inserted Day of Week", "Day of Year", each Date.DayOfYear([FullDateAlternateKey]), type number),
    #"Inserted Day Name" = Table.AddColumn(#"Inserted Day of Year", "Day Name", each Date.DayOfWeekName([FullDateAlternateKey]), type text),
    #"Added Custom" = Table.AddColumn(#"Inserted Day Name", "Fiscal Year", each if [Month]>=StartOfFiscalYear
then [Year]+1
else [Year]),
    #"Changed Type1" = Table.TransformColumnTypes(#"Added Custom",{{"Fiscal Year", Int64.Type}}),
    #"Added Custom1" = Table.AddColumn(#"Changed Type1", "Fiscal Period", each if [Month]>=StartOfFiscalYear
then [Month]-(StartOfFiscalYear-1)
else [Month]+(12-StartOfFiscalYear+1)),
    #"Changed Type2" = Table.TransformColumnTypes(#"Added Custom1",{{"Fiscal Period", Int64.Type}}),
    #"Inserted Division" = Table.AddColumn(#"Changed Type2", "Inserted Division", each [Fiscal Period] / 3, type number),
    #"Rounded Up" = Table.TransformColumns(#"Inserted Division",{{"Inserted Division", Number.RoundUp, Int64.Type}}),
    #"Renamed Columns1" = Table.RenameColumns(#"Rounded Up",{{"Inserted Division", "Fiscal Quarter"}})
in
    #"Renamed Columns1"
Summary
In summary you’ve seen how you can add fiscal year, period, and quarter to a date dimension. examples used in this post are generic. You can use these calculations in any type of date dimension. Fiscal week calculation is different, and is not generic for everyone, I’ll write a blog post separately for that. I will talk about adding public holidays to this date dimension in next post. So stay tuned.
Video


Reza is author of more than 14 books on Microsoft Business Intelligence, most of these books are published under Power BI category. Among these are books such as Power BI DAX Simplified, Pro Power BI Architecture, Power BI from Rookie to Rock Star, Power Query books series, Row-Level Security in Power BI and etc.
He is an International Speaker in Microsoft Ignite, Microsoft Business Applications Summit, Data Insight Summit, PASS Summit, SQL Saturday and SQL user groups. And He is a Microsoft Certified Trainer.
Reza’s passion is to help you find the best data solution, he is Data enthusiast.
His articles on different aspects of technologies, especially on MS BI, can be found on his blog: https://radacad.com/blog.
eagerly awaiting your “fiscal week” article, I’ve been trying to figure that out for months…
Hi Jon,
This is coming very soon 🙂
Any updates on the Fiscal week post?
Hi Oliver
I will write about that soon.
How is your fiscal week scenario? is it starting on the first Monday of January for example?
Cheers
Reza
Awesome, step-by-step for us newbies! I really appreciate the help.
How do I ensure that my start year is custom and not january. I specified this in the Start Date but when adding columns it does not work.
Thanks
Hi Mike
If you want to have a custom start date anytime in the year. you can start building the dimension with a start DATE variable. and set it to whatever date you prefer, and start right from that date.
Cheers
Reza
How do you get the chart to order correctly? My charts are ordering 2019 Q1 December, 2019 Q1 November, 2019 Q1 October, 2019 Q2 February, 2019 Q2 January ect…
you need to sort the month name column by the Month(month number). here I explained how
Cheers
Reza
awesome!
What about us here in the UK where our Fiscal Yeart starts on April 6 (!?). How would I tell my PowerQuery instance to show the FY between 06/04/2020 – 05/04/2021 ? Any help would be very much appreciated. Paul
Interesting, Never knew about 6th or April ?
You can add a custom column with this code (this will give you the Fiscal Year based on start being 6th of April):
if ([Month]<4 or ([Month]=4 and [Day]<6))then [Year]
else [Year]+1