
In previous post, I described what is Power Query, and how we can use that for self service ETL. You’ve how to work with Power Query menus and connect to different data sources, and apply multiple transformations on the data. In this post I’ll go one step closer to the core of Power Query Formula Language known as M. In this post you will learn about structure of M language with demo samples.
As you’ve learned in previous section, Power Query uses a GUI in Excel Add-In to fetch data from different sources and transform it with some functions. Every changes that you apply on the dataset through GUI will be translated to the formula language "M". M is a functional language. M is a powerful language, and the good news is that M is much more powerful than what you see in the Excel GUI of Power Query. The GUI doesn’t implemented all functionality of M. So for advanced use of Power Query you would require to work with M directly. So as much as you expert yourself in M, would result better use of Power Query. So I dare to say learning M is not only the fundamental step but also the most important step in learning Power Query.
Follow these steps to get into the Query mode of Power Query;
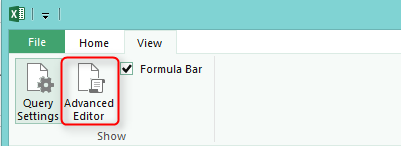
Open Query Editor (In previous post you’ve learned that you can open query editor from Excel’s Power Query tab). In the Query Editor window go to View tab, and click on Advanced Editor menu item.
You will see the Query script window opens.
Now let’s go through some features of M language with a sample; In this sample I don’t use an external data sources, I just use static tables to show you how we can do everything with just script.
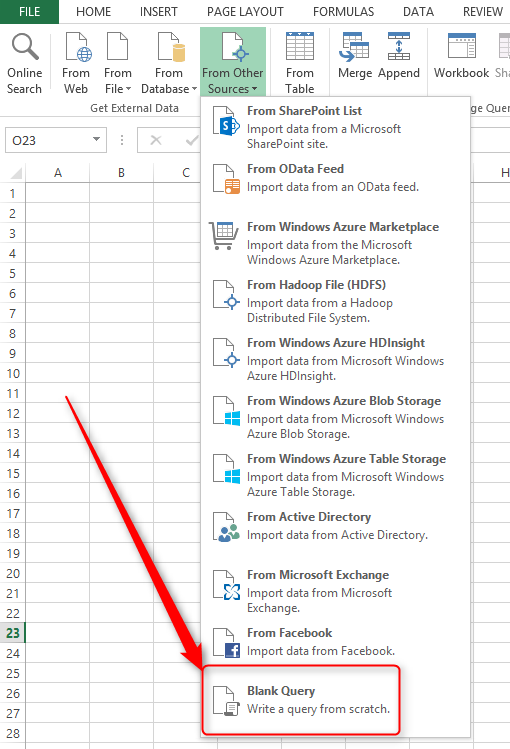
1- Open an empty excel sheet, and in the Power Query tab, In the "Get External Data" section click on "From Other Sources" and then choose "Blank Query".
2- In the Query Editor window, go to View tab, and click on Advanced Editor. you will see the script below in advanced editor window:
let
Source = ""
in
Source
3- Type inside double quotes the string "Hello World!", and then click OK. you will see the result in the Query Editor window as screenshot below illustrates
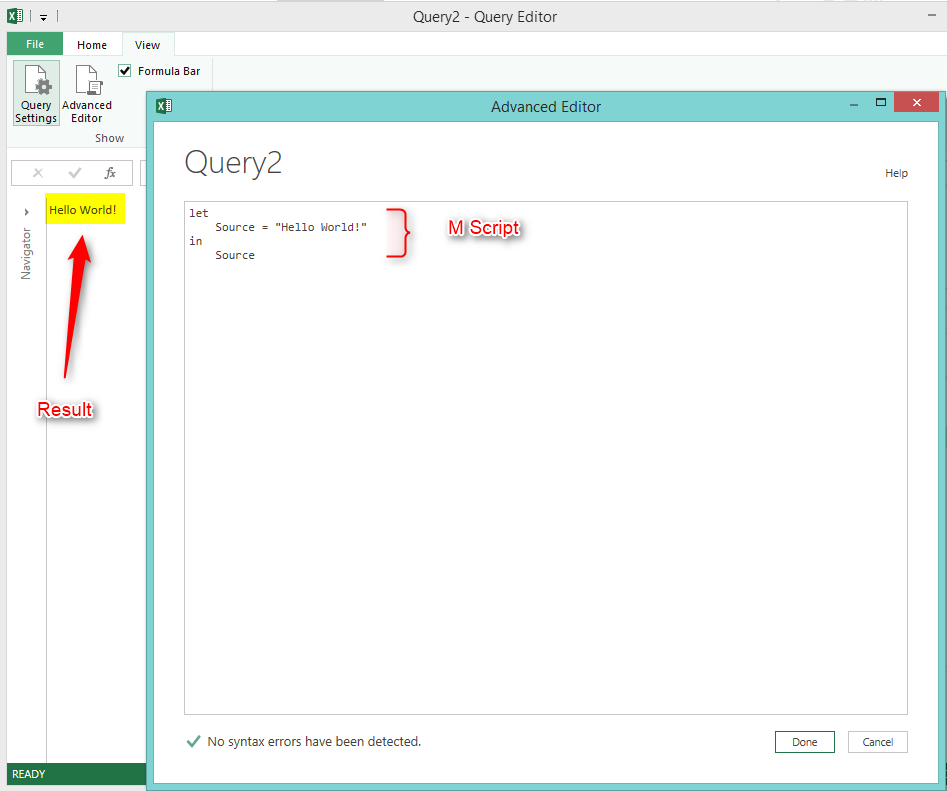
Wow, That was your first M script. and it was very simple script. You see that script editor is not that much powerful like Visual Studio or SSMS, So the editor only is the location for writing the script with a very high level validation bar in the left down part of the window.
The script that you’ve written has two parts; Let, and In.
Let; is the definition area. here we define variables, records, lists and etc. as you see in this example we defined a variable named "Source", and we assigned a string to it: "Hello World!".
If you define more than one variable, record, or list, you can separate them by a single comma.
for example:
let
x=12,
Source="Hello World!"
IN; is the functional area. you can write result out to the output with this section. in our example we just write down the value of "Source" variable into the Power Query editor window.
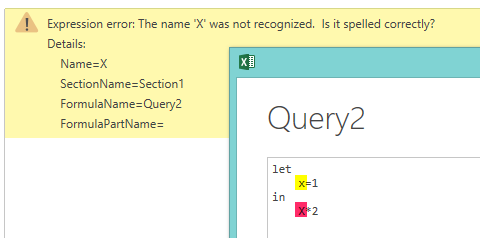
4- M is case sensitive. you can check that with the script showed in below screenshot.
5- M contains Literals or Values. Values can be used as below;
1 // number
"Hello World!" // string
true //logical
6- Comments; Comments can be determined as single line or multiple lines.
// this is comment markup for single line comments
/* this is multiple lines comment markup */
7- Variables define simply in let section with naming the variable and assigning it. for example "Source" variable in example above.
let
// This is single line comment
x=1,
y=2
in
/* this is
multiple lines
comment */
x+y
8- Defining records and tables; You can define records in let section within two brackets { }, columns in the record will be separated by comma.
a sample record can be defined as following: {1,"Reza","Rad"}
For defining a table you can follow this structure:
TableX=#table( {"Column A","Column B"} ,{ {1,11},{2,22} })
9- Now let’s do a real sample with data.
Define a table as below:
let
TableA = #table({"CustomerId", "TranDate","TranCount"},
{
{1,DateTime.FromText("2014-01-01 01:00:00.000"),10},
{1,DateTime.FromText("2014-01-01 02:00:00.000"),5},
{1,DateTime.FromText("2014-01-03 01:00:00.000"),5},
{1,DateTime.FromText("2014-01-04 02:00:00.000"),80}
})
in
TableA
The result set of TableA would be as below:
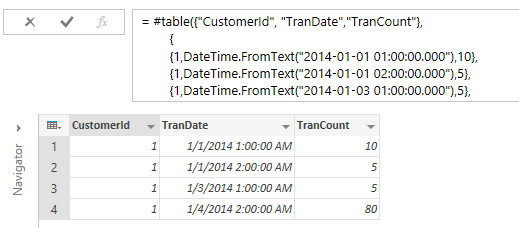
As you see we’ve used the function DateTime.FromText in this example. this function converts text to datetime data type.
The table defined in this example has three columns; CustomerId, TranDate, TranCount
10- Define second table as below:
TableB = #table({"CustomerId", "TranDate","TranCount"},
{
{1,DateTime.FromText("2014-01-01 02:00:00.000"),10},
{1,DateTime.FromText("2014-01-01 03:00:00.000"),5},
{1,DateTime.FromText("2014-01-02 01:00:00.000"),20},
{1,DateTime.FromText("2014-01-02 03:00:00.000"),15},
{2,DateTime.FromText("2014-01-01 01:00:00.000"),5},
{2,DateTime.FromText("2014-01-01 02:00:00.000"),80}
})
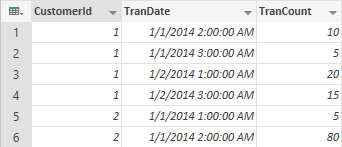
this is illustration of second table
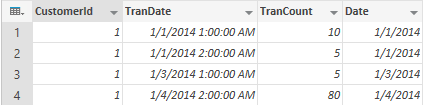
11- purpose of this part of example is to group TableA by date. for grouping this table we transform it to another table with a new column: date. Date column would only contains date part of TranDate column (not the time portion of it). we use Table.AddColumn function for this purpose.
TableATransformed= Table.AddColumn(TableA,"Date",each Date.From([TranDate]))
Table.AddColumn(<table name>,<new column name>, expression for new column)
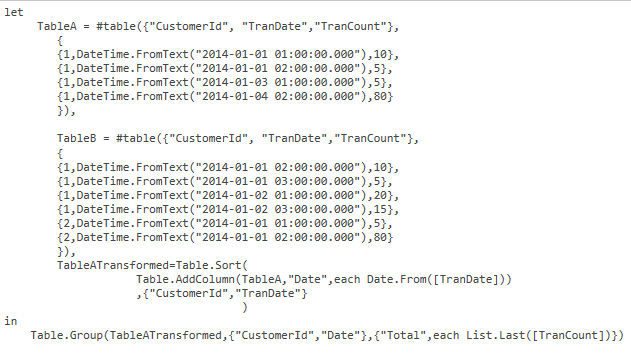
here is the full script for this example:
let
TableA = #table({"CustomerId", "TranDate","TranCount"},
{
{1,DateTime.FromText("2014-01-01 01:00:00.000"),10},
{1,DateTime.FromText("2014-01-01 02:00:00.000"),5},
{1,DateTime.FromText("2014-01-03 01:00:00.000"),5},
{1,DateTime.FromText("2014-01-04 02:00:00.000"),80}
}),
TableB = #table({"CustomerId", "TranDate","TranCount"},
{
{1,DateTime.FromText("2014-01-01 02:00:00.000"),10},
{1,DateTime.FromText("2014-01-01 03:00:00.000"),5},
{1,DateTime.FromText("2014-01-02 01:00:00.000"),20},
{1,DateTime.FromText("2014-01-02 03:00:00.000"),15},
{2,DateTime.FromText("2014-01-01 01:00:00.000"),5},
{2,DateTime.FromText("2014-01-01 02:00:00.000"),80}
}),
TableATransformed= Table.AddColumn(TableA,"Date",each Date.From([TranDate]))
in
TableATransformed
And the result is:
12- in this step we sort records with Table.Sort function as below:
TableATransformed=Table.Sort(
Table.AddColumn(TableA,"Date",each Date.From([TranDate]))
,{"CustomerId","TranDate"}
)
Table.Sort works in this structure;
Table.Sort (<table>,<columns to be sorted>)
Columns to be sorted can be defined in order like a record. for our example we used {"CustomerId","TranDate"}, which means sorting will be applied on CustomerId first and then on TranDate. this expression is similar to this T-SQL order by clause; order by CustomerId, TranDate
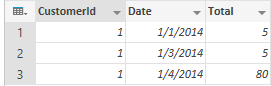
13- We use Table.Group function to group records by the Date Column.
Table.Group(TableATransformed,{"CustomerId","Date"},{"Total",each List.Last([TranCount])})
Table.Group(<table>,<group key columns>,{<name of the new aggregated column>,<expression>})
List.Last([TranCount]) function will return the last record’s TranCount.
Result would be as below:
14- Now repeat same expression for Table B.
TableBTransformed=Table.Sort(
Table.AddColumn(TableB,"Date",each Date.From([TranDate]))
,{"CustomerId","TranDate"}
) ,
TableBGrouped=Table.Group(TableBTransformed,{"CustomerId","Date"},{"Total",each List.Last([TranCount])})
15- In this step we want to join TableA and TableB on two fields; CustomerId, and Date. we will use Table.Join function for this purpose.
Table.Join works with this syntax:
Table.Join(<first table>,<first table keys>,<second table>,<second table keys>,JoinKind optional, JoinAlgorithm optional)
The important things to note before applying join in Power Query is that the Table.Join works only on datasets with different column names. so if there be a column with similar name in both tables, it would return an error. In this example both tables has similar structure with similar column names, so we use Table.PrefixColumns to change name of columns for one of the tables.
Table.PrefixColumns(<table>,"Prefix")
Result of Table.PrefixColumn would be same table with the "Prefix" at the begining of each column name.
so this expression
Table.PrefixColumns(TableAGrouped,"TableA")
will result
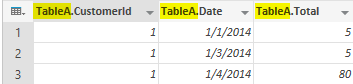
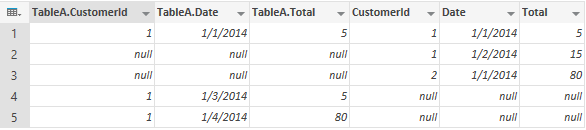
now we can join two tables based on CustomerId and Date column, as below:
in
Table.Join(Table.PrefixColumns(TableAGrouped,"TableA"),{"TableA.CustomerId","TableA.Date"},TableBGrouped,{"CustomerId","Date"},JoinKind.FullOuter)
Join kind can have any of these values:
JoinKind.Inner=0
JoinKind.LeftOuter=1
JoinKind.RightOuter=2
JoinKind.FullOuter=3
JoinKind.LeftAnti=4
JoinKind.RightAnti=5
(Left Anti and Right Anti will return only records from a table that doesn’t have a match in the other table -based on left/right respectively)
you can use codes instead of enumeration. this means that expression below would return same result as previous one:
Table.Join(Table.PrefixColumns(TableAGrouped,"TableA"),{"TableA.CustomerId","TableA.Date"},TableBGrouped,{"CustomerId","Date"},3)
But it is highly recommended to use enumeration because it is much easier to read.
result of above expression would be as below:
Here is the full script for this example:
let
TableA = #table({"CustomerId", "TranDate","TranCount"},
{
{1,DateTime.FromText("2014-01-01 01:00:00.000"),10},
{1,DateTime.FromText("2014-01-01 02:00:00.000"),5},
{1,DateTime.FromText("2014-01-03 01:00:00.000"),5},
{1,DateTime.FromText("2014-01-04 02:00:00.000"),80}
}),
TableB = #table({"CustomerId", "TranDate","TranCount"},
{
{1,DateTime.FromText("2014-01-01 02:00:00.000"),10},
{1,DateTime.FromText("2014-01-01 03:00:00.000"),5},
{1,DateTime.FromText("2014-01-02 01:00:00.000"),20},
{1,DateTime.FromText("2014-01-02 03:00:00.000"),15},
{2,DateTime.FromText("2014-01-01 01:00:00.000"),5},
{2,DateTime.FromText("2014-01-01 02:00:00.000"),80}
}),
TableATransformed=Table.Sort(
Table.AddColumn(TableA,"Date",each Date.From([TranDate]))
,{"CustomerId","TranDate"}
) ,
TableBTransformed=Table.Sort(
Table.AddColumn(TableB,"Date",each Date.From([TranDate]))
,{"CustomerId","TranDate"}
) ,
TableAGrouped=Table.Group(TableATransformed,{"CustomerId","Date"},{"Total",each List.Last([TranCount])}),
TableBGrouped=Table.Group(TableBTransformed,{"CustomerId","Date"},{"Total",each List.Last([TranCount])})
in
Table.Join(Table.PrefixColumns(TableAGrouped,"TableA"),{"TableA.CustomerId","TableA.Date"},TableBGrouped,{"CustomerId","Date"},JoinKind.FullOuter)
We will go through more data transformation in next blog posts.


Reza is author of more than 14 books on Microsoft Business Intelligence, most of these books are published under Power BI category. Among these are books such as Power BI DAX Simplified, Pro Power BI Architecture, Power BI from Rookie to Rock Star, Power Query books series, Row-Level Security in Power BI and etc.
He is an International Speaker in Microsoft Ignite, Microsoft Business Applications Summit, Data Insight Summit, PASS Summit, SQL Saturday and SQL user groups. And He is a Microsoft Certified Trainer.
Reza’s passion is to help you find the best data solution, he is Data enthusiast.
His articles on different aspects of technologies, especially on MS BI, can be found on his blog: https://radacad.com/blog.