In this post, I am going to show how to connect the Power APP, that you created in Part One for the aim of taking a photo from your receipt, send it to the Microsoft Flow and cognitive service to convert the image to text.
First, you need to follow the link for the creating a Microsoft APP for taking an image using the below link: Part 1.
Now we need to go to the Microsoft Flow website and login with the valid account.
https://australia.flow.microsoft.com/en-us/
Microsoft Flow is a website that helps you to create a workflow to automate the process.
For instance, we want every time we received an email from a specific sender, the email content save in the SharePoint folder.
or another scenario is about, whenever a tweet about the #powerbi has been shared in Twitter, sentiment analysis applies to the tweet content to extract the main keyword of the tweet then show it live in Power BI.
All these two are an example that Microsft flow can handle. for the first example, the trigger of the process is receiving the email. Flow trigger the process to send the text from email to SharePoint automatically.
Create Flow
After log in to the Microsoft Flow website, on the main page of the Microsoft flow, you able to see three main areas, the panel in the left side is the templates, created flows, at the top there is a possibility to create new flow and in middle of the page the list of the flow has been created with date and time they run before is shown.
to create a new flow click on the New ->Create from Blank.
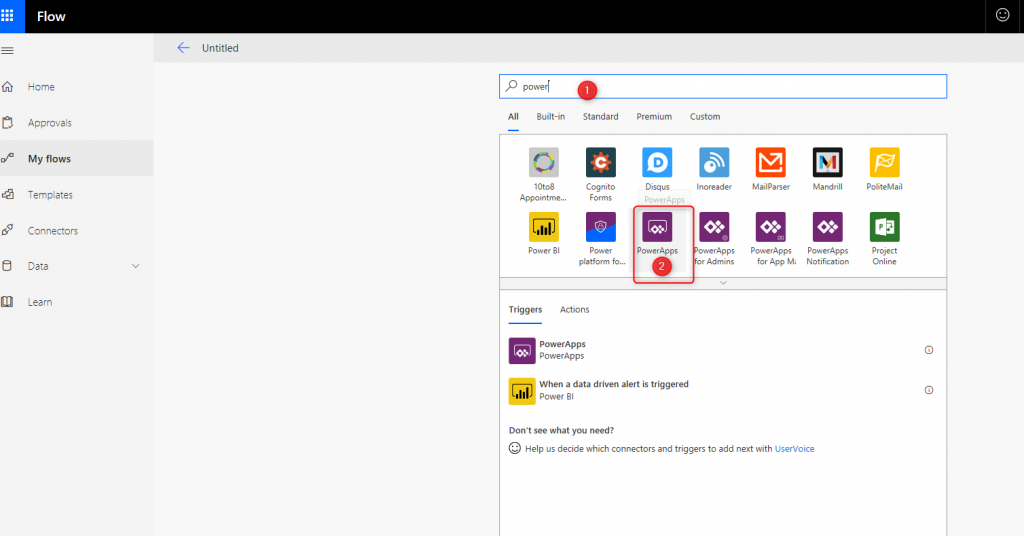
then in the new page for the trigger choose the Power Apps as shown in the below picture.
Now the first trigger which is Power Apps has been added. as you can see in the below picture, this trigger does not accept any input from Flow (which means it just provides data). The Power Apps, able to provide the Picture that has been taken, now we need to add New Step to pass it to the cognitive service component. But Cognitive Service for OCR not able to accept the format of the picture that Power Apps provide, as a result, we need to store it first in Sharepoint then pass it with some data conversion to the Cognitive Service.
So, click on the New Step to add another object which is Sharepoint->Create File
IN then next step we need to provide four different fields: Share Point Site Address, the folder to save the image, The name of the file with jpg format and the content of the file that is CreatedFile_FileContent
After providing these values, the next step is to add a new step to pass the file that has been stored in the SharePoint folder to OCR service. Hence, in the new step search for OCR and you able to see we have a component named Optical Character Recognition (OCR) to Text, just be careful to choose the Text not JSON,
in the next step, you need to provide some information for the OCR component: Image Source that needs to be chosen as image content, Then For Image Content field, we need to write some function that converts the image to binary value.
in Flow, there is a possibility to convert the data, for this scenario we have to convert the URI to Binary value. using the dataUriToBinary(), the value for this function is the CreatedFile_FileContent
Now, the function able to be added to the Image Content field. Just puch the Ok Button.
In the next step, we are going to add another step as Respond in Power Apps.
you need to choose the Output Data Type
as we are going to show the text
Next, two data filed be shown that need to be filed: Output Name that is any variable name you want to be shown, I choose OCRResult, the other one is the output from OCR component, which is Detected Text.
After filling up all these two fields, there is a need to Save then Test the flow.Moreover, at the top left side of the page, yo uable to provide a proper name for the Apps. I choose the FlowAppOCR
if you run it for the first time, be careful about below key points
1- you need to create an OCR service before in your Azure Portal or in Cognitive Services if you run the flow for the first time, it is going to validate the API key, Name of the service and the Endpoint.
2-for the first time it is going to ask permission about putting a file in Sharepoint folder.
before testing the Flow by Power Apps, first, test it in Microsoft Flow to make sure you have enough permissions.
Then we need to navigate to the Power Apps to make it final Products.
The next Post, I will explain the process of how to connect the Power Apps and Flow.
also for this post, the video provided by Paul O’Flaherty: https://www.linkedin.com/in/paul-o-flaherty-1920864/helps me a lot. Also watch his videos on this
https://www.youtube.com/watch?v=qXSRKfYqYMM&t=1929s


