Power BI Embedded, which I have written about it previously, brings the power of Power BI into your application. Power BI Embedded Recently had major changes. If you remember from my previous post, there were many limitations in the type of content you can embed into your application and the ways of interacting with it, and even in licensing. Now with new version of REST API for Power BI, everything changed. However, changes are in a good way; you gain more, loose nothing! This blog post series is about new way of integrating Power BI report into your application and reveals some of the questions you might have in this path. if you like to learn more about Power BI; read Power BI book; from Rookie to Rock Star.
Power BI Embedded – Previous Version
Previously, if you wanted to embed Power BI content into your application, you could. However, you could only do that for Power BI reports with DirectQuery connection to Azure SQL Database. Every other type of data source was not supported! This was the main barrier for everyone wanted to use this service. Difficulty in provisioning the content was another problem. With previous version of Power BI embedded, you couldn’t use the content published in Power BI website. You needed to publish content separately into different location (Azure Power BI Embedded Workspace). With previous method you could not embed dashboards or tiles, it was just reports. Licensing plan for Power BI Embedded was another issue; totally unpredictable.
Integrate Power BI content into your Application – New Way
New way of integrating Power BI into your application is so powerful and fascinating, that it doesn’t even bring the name of embedded with it. it is more like integration. That’s why many people call it Integrating Content into Power BI. with the new way; you can bring any content (Power BI Dashboard, Tile, and Report) into your application. Content can be sourced from ANY type of data sources, it can be import data or LiveQuery or DirectQuery, it can use Gateways or get it from cloud data sources. You can easily integrate the same content which is published into Power BI service. and the licensing plan is different, more predictable I’d say.
Let’s take a look at this new way in a blog post series, starting from this one.
Sample Code
The sample code for this example can be downloaded from here. This sample code won’t be used in this particular post, but next posts after this will need it.
Power BI REST API
In this post I will be using Power BI REST API which is at the moment version 2. If you download the sample code above, then you don’t need to download API separately. However, if you are starting a new project, you can go to Nugget Manager in Visual Studio and search for Power BI REST API.
The new version of Power BI REST API has MANY features, which I will talk about them in a series of blog posts. In fact, features are so much that cannot fit into few posts. So, stay tuned for lots of upcoming posts about it. In this post I’ll focus on few functionalities that is useful for integrating report into your application.
Register Your Application
First step is to register your application. What does that mean? Any application which wants to interact with Azure should be registered, and authorized through a process. To register your application there are two ways; one is simpler to start, the other one is simpler to maintain 🙂
Register through App Registration website
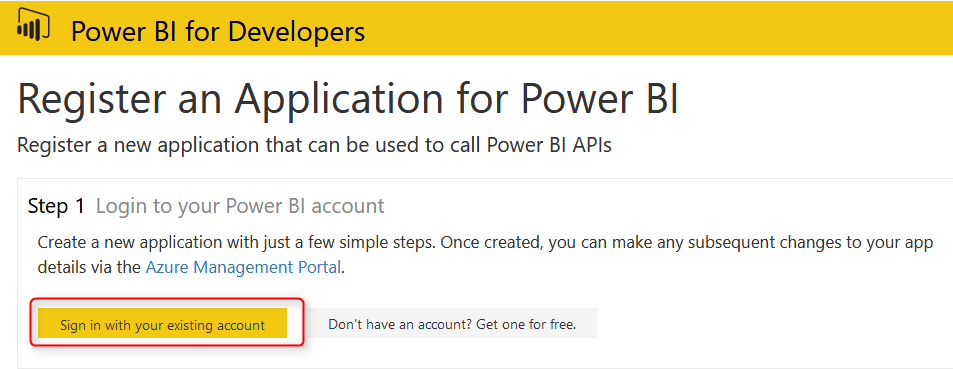
Go to this website, and register your application from there. it is a very easy process, let’s have a look. Login with your Power BI account first;
After signing in, you can specify a name for your application (just to be able to find it easier in a list of applications). also select the application type.
There are two types of applications: Server-side web app, and Native app. what is the difference?
- Server-side Web App; An application that runs on a server, and browsed through clients. Such as web applications and mobile applications in most of the cases.
- Native app; an application that build to run on a specific environment. such as Console application.
Types of Integrating Power BI Content into your application
Before selecting the right application type, you need to understand that there are two types of integrating Power BI content into an application:
- Integrating without a Token: You are integrating content into your application, and you will be using Power BI users for access to the content. This means everyone who wants to look at the content should have Power BI account.
- Integrating with a Token: You are integrating content into your application, and you are NOT using Power BI users. You will be managing user authentication through your own application. Users may not even have Power BI accounts.
In this example we are talking about integration WITH a Token.
Very Important: If you are using the method of integration “With a Token”, then no matter what type of application you are writing. You have to choose Native App from the type of application above, even if you have a web/mobile application.
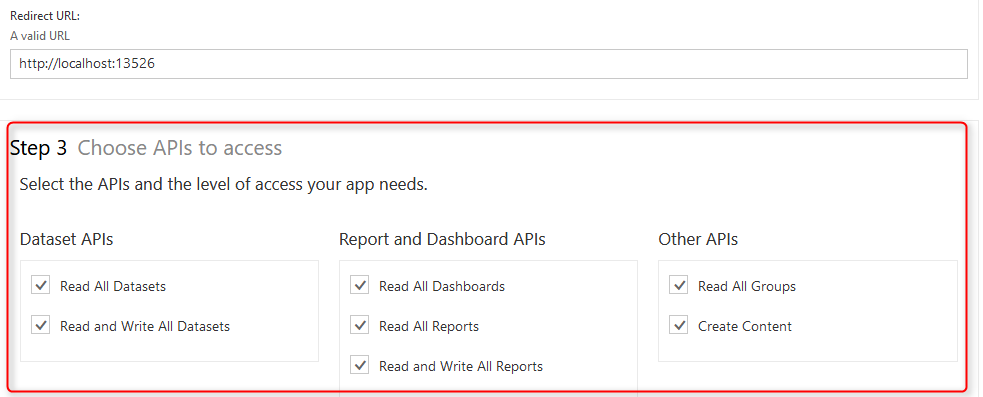
After selecting Native app, then set a redirect URL. For this example, you can simply set it to be: http://localhost:13526
This redirect URL is not that much important, later in future posts I’ll explain about it. You can even set it to be other URLs.
Next step is to decide what permissions you want for this application. As you can see in below image, there are different levels of permissions you can apply. It is not usually good idea to give full permission to an application, however for the test purpose you can select all permissions in below list. For this example you might only need Read All Reports.
Register your application
Last step in this section is to click on Register your application, you will get a Client ID.
If you register a server-side app, you will also receive a client Secret along with client ID. Client ID (and Client Secret), are important factors for your application to be able to interact with Azure and Power BI service.
Register Application through Azure Portal
Another method of registering application is through Azure Portal. Go to http://portal.azure.com, for this way of registration. The previous method of registration is easier and more user friendly. This method is much better for maintaining an application. With previous method, there is no way of maintaining an application. you can only initiate registration from there. If you want to change permissions or anything related to the application later on, the only way is through this method: Azure Portal.
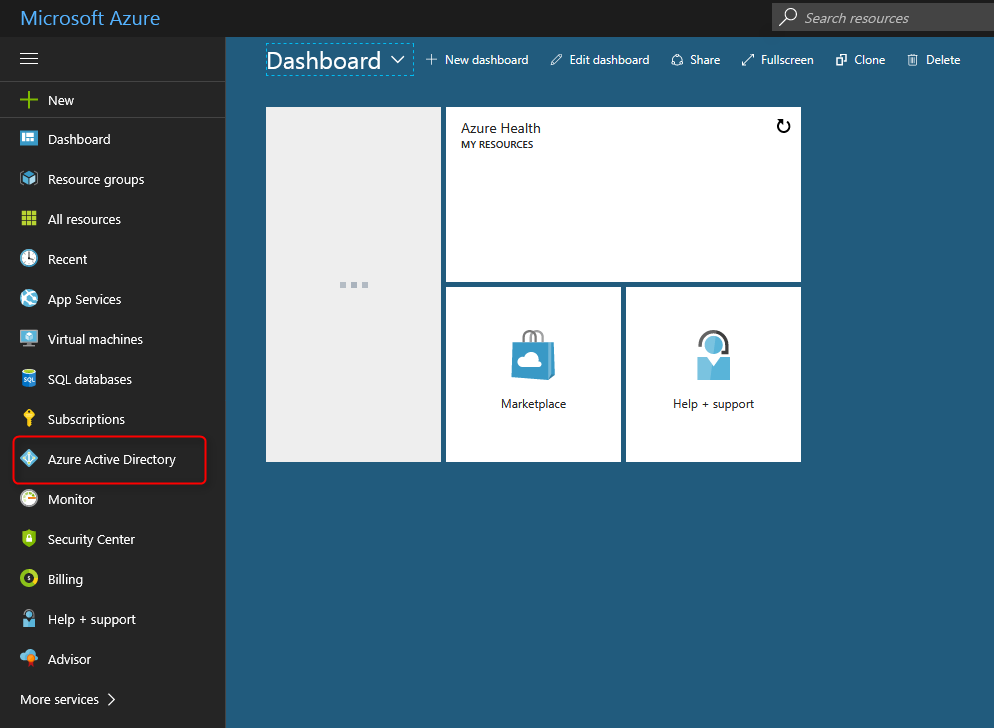
In Azure portal, go to Azure Active Directory;
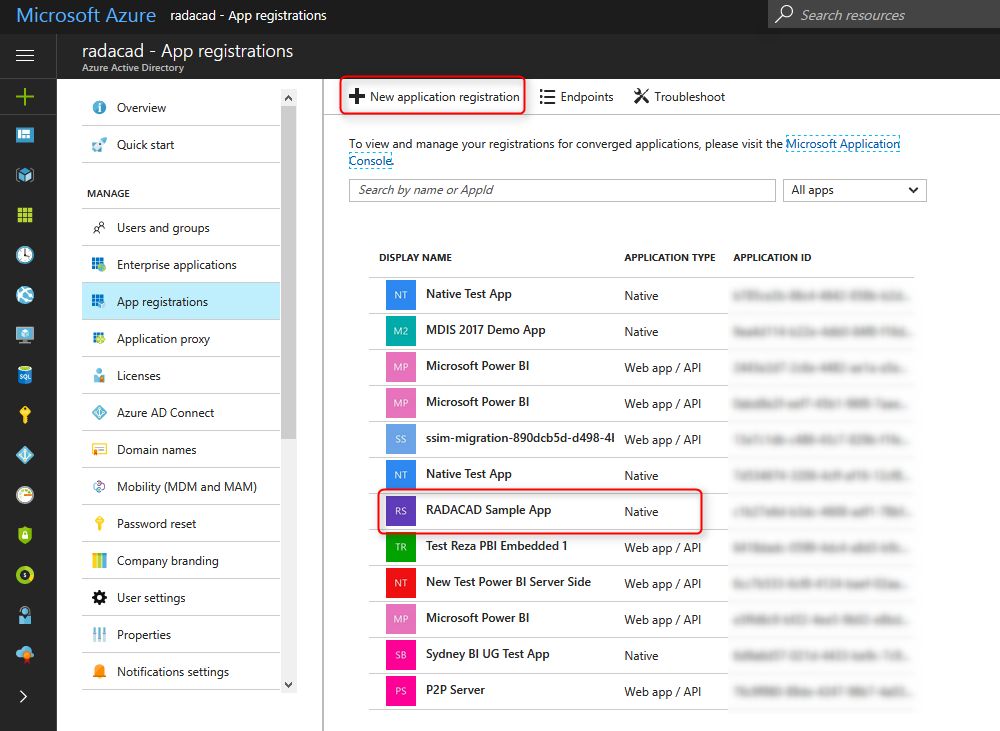
Then go to App Registrations
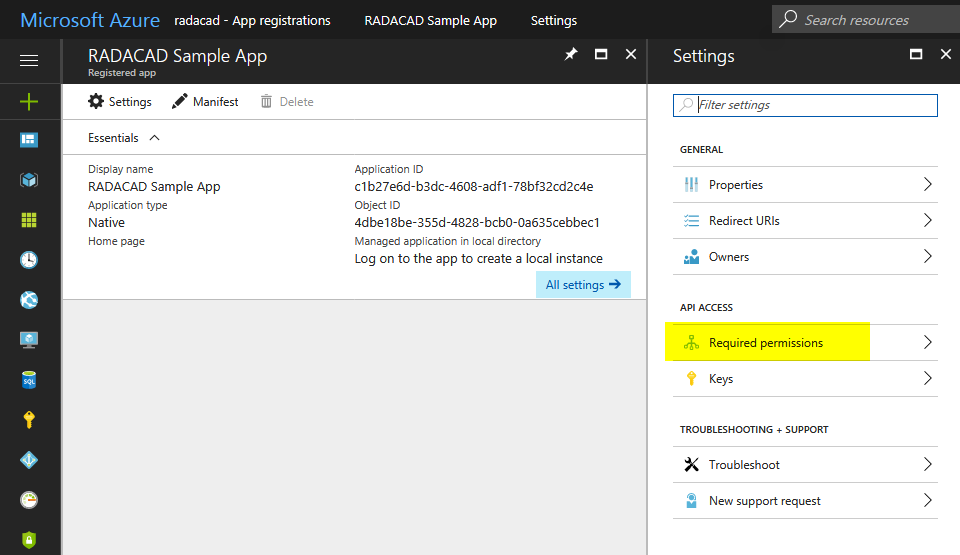
Here you can register your application. or you can even find your existing application. screenshot below shows the RADACAD Sample Application I have registered above;
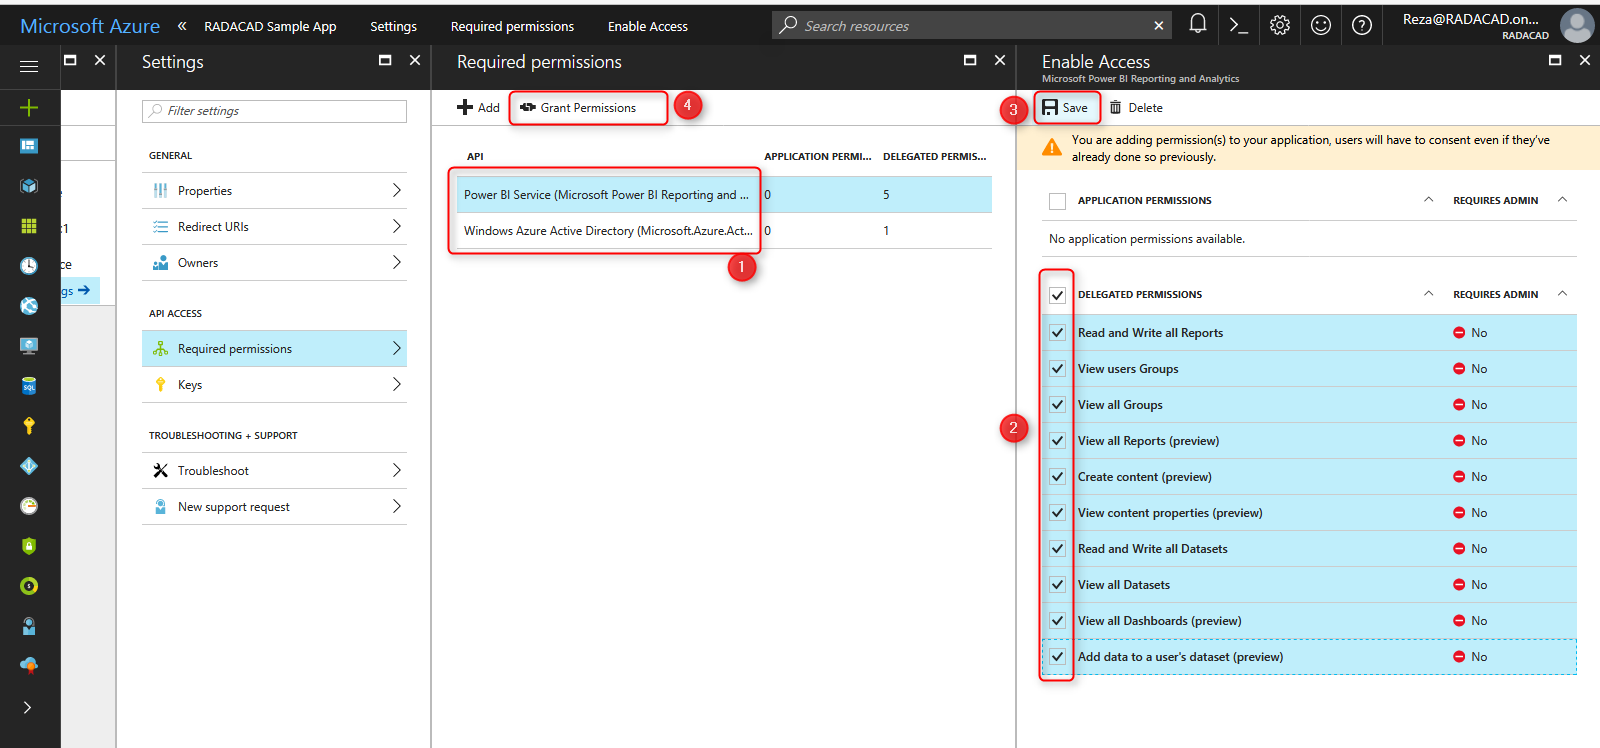
After selecting the application, you can go to Required Permissions to set up permissions for this app.
For Power BI apps you will find two sets of Permissions; for Power BI, and for Azure Active Directory. after selecting the set, then you can select permissions required, then save. Don’t forget to click on Grant Permissions after that, otherwise permissions won’t be granted!
You can check permissions assigned then in the list later if you want.
Process of registering your application is done, now the next step is to start scripting and coding of your application with Power BI REST API.






Nice work, I’m very interested in the following articles.
Great article thanks very much….
A quick question though..
Do you need to register the app for every organisation that is to use the app ? or only once for the developer of the application.
Eg – An on premise Application distributed to hundreds of different companies
– Those companies have their own BI accounts and users.
– Application wishes to have an interface to powerbi.
– Each company using the application are asked to provide a URL link to their Dashboards and reports they want included in the app along with user names and password.
– Therefore the content resides in the Powerbi accounts and organisations only. They do not exist in the organisation that is writing the interface.
So does the developer register the application only once and recieve the ClientID and Secret once.
OR
Does the developer need to have every company using their application register the application within their organissation and configure their individual client ids and secrets placed in the application in order to consume the Powerbi content
Any help appreciated
Hi Shaun,
Only the company which creates and develop the application needs to register.
Cheers
Reza
Thanks Reza – Much appreciated