

In the part 1, you learned how to register an application to be able to interact with Power BI service and Azure environment. In this part, I’m going to explain what is the process involved after that in order to authenticate through your application into Azure Active Directory. This step is important step before doing any work with Power BI REST API, after completing this step, you can then create a Power BI client object that can be used for embedding Power BI content, data source and gateway management, and all other operations with Power BI objects. if you like to learn more about Power BI; read Power BI book; from Rookie to Rock Star.
Step 1: Register your Application
Step 2: Authenticate
Every application which want to interact with Azure environment, should go through an authentication process. This authentication process is passing Client ID (and sometimes Client Secret) to Azure, and getting an authentication code. From this authentication code, and access Token can be fetched. This access token is a property that should be involved in every request sent from your application to Power BI and Azure afterwards. Without this access token your requests will fail.
Get Access Token
As mentioned above, you need to get the access token in order to interact with Power BI REST API. This access token can be fetched through a process of authentication with Azure. the process itself, requires a full blog post at least to explain. below is the flow diagram of the process;
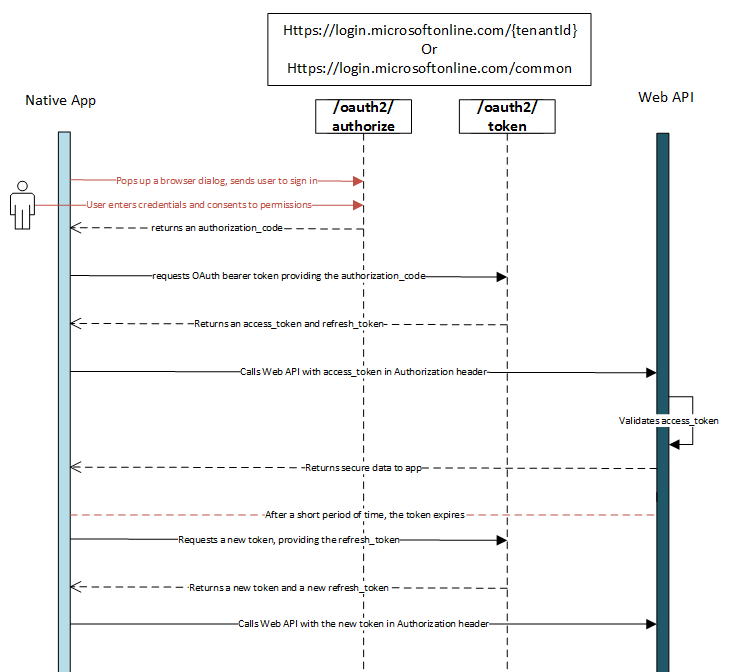
I’m not going to explain details of this flow in this post. If you are interested in that details, read this document.
In this post, I only show you few lines of code, that do this for you.
Sample Code
The sample code for this example can be downloaded from here.
Get Access Token from C# Code
After opening the sample code above, go to Web.Config file

In the web.config file, you will see some settings such as ApiURL, and EmbedURL, and some other configurations. Leave these as is. Just put your CLIENT ID there (the one you’ve got from previous step of registering your application). For this example you don’t need Client Secret. Also you need to specify your Power BI username and password, make sure that these are saved from a secure place, and fetched from there.
Sample Application Structure
The sample application used here is an MVC application which has three layers; Model, View, and Controller. I’m not going to explain details of that, you need to read a book to understand how MVC works. In a very basic definition; View is presentation layer, Controller is business layer and code logic, and Model is the content passed from Controller to View. Authentication process and getting Access Token in this scenario happens in controller.
Authentication Process
If you open HomeController.cs under Controllers folder, then you will find the first method EmbedReport(), which is doing the authentication process in very first few lines;
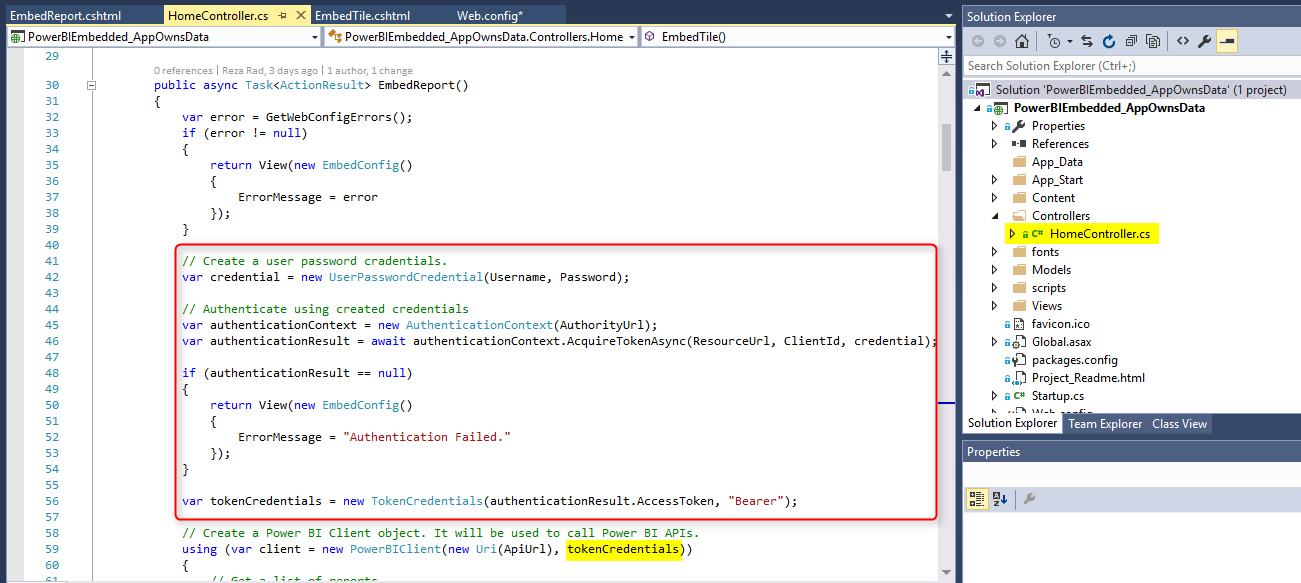
Authentication process in general includes, passing credentials to AuthorityURL, and getting the result back, if application has the access, and authentication goes through correctly, then you will get a result which you can fetch Token from it. The token then will be used in creating a new instance of Power BI Client. Power BI Client is the main object that should be created from REST API in order to interact with Power BI service.
Power BI Client Object
Power BI Client object is the main object needs to be created in order to interact with Power BI Service. As you’ve learned above, you need to have the access token for this step. You just need to parameters to create a Power BI Client object; ApiURL (which is static), and token (which is gained through authentication process above).
var client = new PowerBIClient(new Uri(ApiUrl), tokenCredentials);
After creating this object, you have access to massive amount of information from Power BI Service, and you can implement many actions through it (Which I explain many of these actions in other posts).
Next Steps
After creating Power BI client object, you can do massive operations with it; embedding content into an application, refreshing data set, data source and gateway management, and many other operations. Read next upcoming posts to learn more details about it.


Reza is author of more than 14 books on Microsoft Business Intelligence, most of these books are published under Power BI category. Among these are books such as Power BI DAX Simplified, Pro Power BI Architecture, Power BI from Rookie to Rock Star, Power Query books series, Row-Level Security in Power BI and etc.
He is an International Speaker in Microsoft Ignite, Microsoft Business Applications Summit, Data Insight Summit, PASS Summit, SQL Saturday and SQL user groups. And He is a Microsoft Certified Trainer.
Reza’s passion is to help you find the best data solution, he is Data enthusiast.
His articles on different aspects of technologies, especially on MS BI, can be found on his blog: https://radacad.com/blog.
Great set of articles! How can it work for Users not part of the AAD or AD? We have an external facing app that allows external users to access a set of reports. In addition to this, we need to apply RLS. With the previous version of PBI embedded we use Azure B2B service for authentication and dynamic security for RLS in the PBI model. This does not seem possible with the new PBI embedded dev experience?
Hi Andrew,
You just need one AD account which should be the Power BI account that reports are published through it.
all other users can be any type of users. they don’t need Power BI account neither AAD or AD account. they don’t need to be part of your company, so Azure B2B is not required.
you can give them user name and password from your website. and yes, RLS works perfectly with this.
Cheers
Reza
Hi Reza,
What you’ve done is impressive and I really appreciate that you are spending some time teaching new things.
I wonder if this series of steps can be applied to the new Power BI report server? Let’s say I would like to create my own mobile app, add some Power BI graphs to it, thus, I need to point the APP to connect and authenticato my Power BI on–premise server and pull some graphs through, all this being Mobile friendly. Your thoughts?
thanks!
Hi Marce,
Thanks for your feedback.
I believe this is only possible at the moment with reports published in Power BI service (website), because works with APIURL, and also needs guid for the report and group. Maybe in the future such support be available for on-prem reports hosted in report server.
Cheers
Reza