
There are different methods to use row-level security in Power BI; You can set up Row Level Security in Power BI itself or through a live connection from a data source such as SSAS Tabular. However, row-level security defined in the ways mentioned in the articles above isn’t dynamic. By dynamic row-level security, I mean the definition of security is beside the user account information in the data source. For example, when John logs in to the system, based on data tables that show John is the sales manager for a specific branch, he should be able to see only those branches’ data. This method is possible in Power BI using DAX UserName() or UserPrincipalName() function. In this article, I’ll show you an example of dynamic row-level security with Power BI’s DAX USERNAME() function. If you like to learn more about Power BI, read Power BI online book; from Rookie to Rock Star.
Video
Why Dynamic Row Level Security?
The most important question is, why dynamic row-level security? To answer this question, you must consider the limitation of static row-level security. Static row-level security is simple to implement. However, if you have thousands of roles, then it would be a nightmare to maintain. For example, if you want to create a payroll Power BI report in a company with ten thousand users, you want every user to have his/her role. Dynamic row-level security is the answer for such scenarios.
Sample Data
For this example, I will use data entered in Power BI itself. There won’t be any external data sources. This doesn’t mean that dynamic security has an issue with external data sources. Dynamic security works with any data sources as long as we have related data rows in the tables. For the simplicity of this example, I’ll be using data sources inside Power BI.
For this example, let’s create two simple tables; Sales Rep and Transactions. Sales Rep has information on sales representatives, and transaction data is sales transactions. Each sales transaction is handled by a sales rep. So let’s create sample tables in Power BI. Open Power BI Desktop, and from the Data section, choose Enter Data.
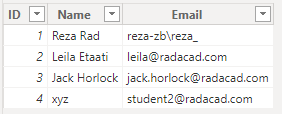
Create a table as above with three columns and data in it. You have to use usernames similar to Power BI accounts that you want to set up security for it. Name this table as Sales Rep.
Create another table for Transactions with the structure below, and name it Transactions:
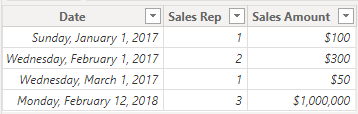
As you can see in the above screenshot, each sales transaction is handled by a sales rep. Again I mention that these tables are added inside Power BI just for the simplicity of this example. Tables can come from everywhere.
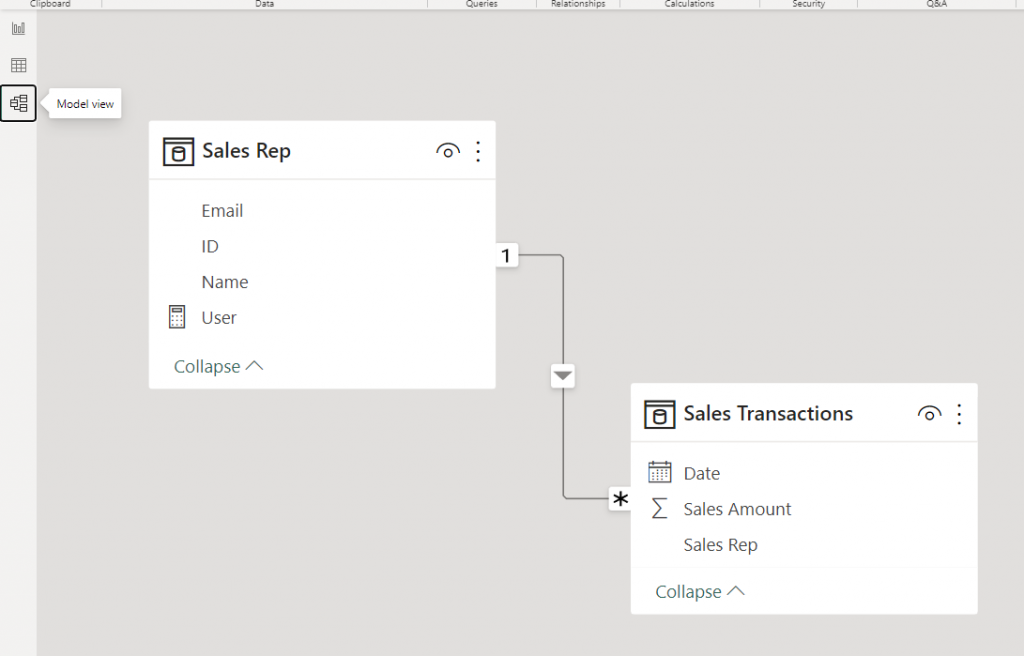
Load tables into Power BI; we don’t need to do anything with Power Query at this stage. Go to the Relationship tab and verify the relationship between Sales Rep (ID) and Transactions (Sales Rep) to be as below;
Sample Report
For this example, I will be using basic table visualization. The table visualization will show Date, Sales Amount (from Transactions), and Name (from Sales Rep).
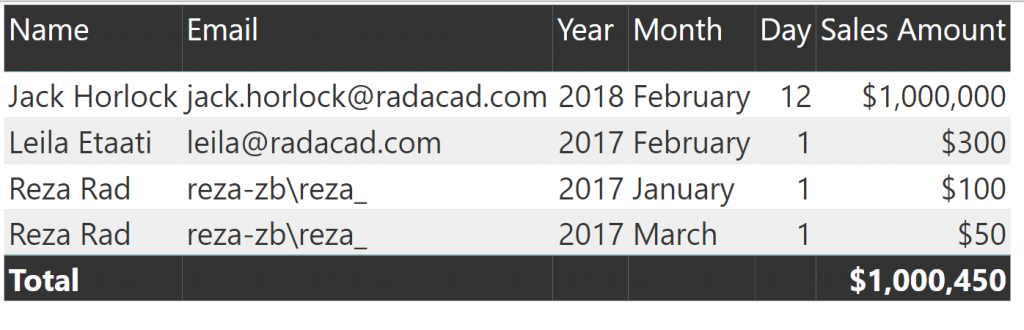
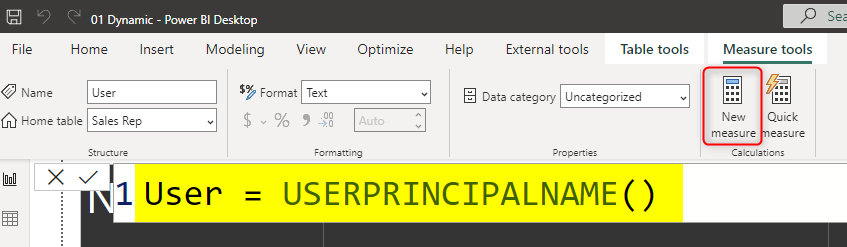
The main reason for this visualization is to simply show that each user will see only their data rows from all tables. I also will add a measure for USERPRINCIPALNAME() in DAX to see the user logged in from my report. So in Data Tab, create a new measure, and name it User, with a value of USERNAME();
Now let’s add a Card visualization to the report. Add the User measure to the card visual. Here is the report’s final view;
DAX Functions: UserName() and UserPrincipalName()
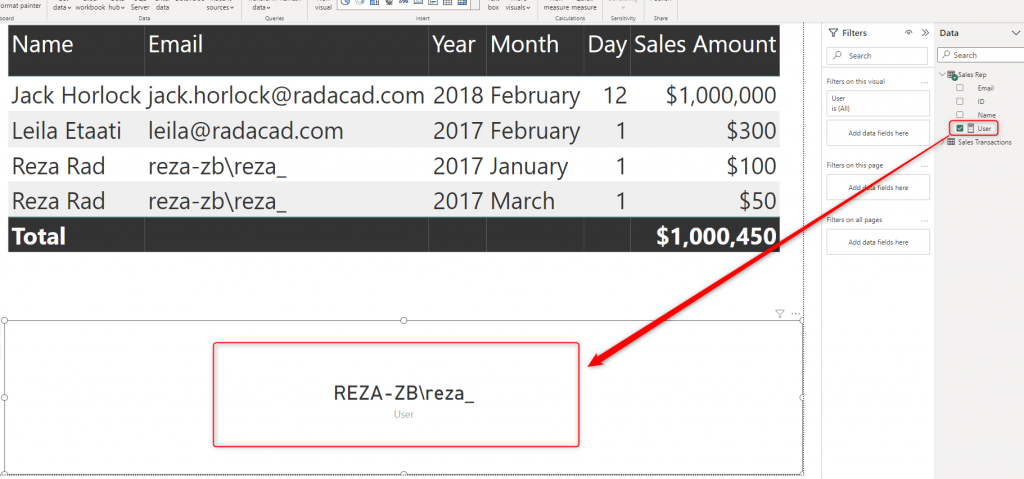
USERNAME() function in DAX returns the username of the logged-in user. However, there is a small trick for it. If we don’t set up row-level security for our report, USERNAME() function will return the user id. To understand what I mean, publish your report to Power BI and browse it to see what you will see.
UserPrincipalName() function in DAX works exactly like UserName() function with the difference that it will always return the username (not the unique identifier). So basically UserPrincipalName() is a better function for testing, but the works both the same in a production environment. Now let’s set up row-level security and assign users to it to see how it works.
Row Level Security in Power BI Desktop
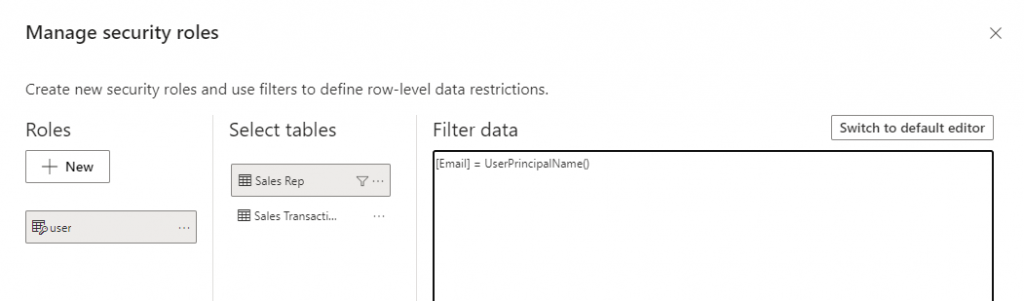
I have explained in another post how row-level security in Power BI Desktop works, so if you want to learn more, read this blog post. Here I will only use that technique to filter each role based on their username with the DAX username() function. To create security, go to the Modeling tab, Manage Roles. Create a role and name it Sales Rep. and define a filter on the Sales Rep table as below;
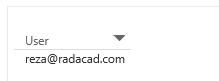
[Username] = USERPRINCIPALNAME()
This filter simply means that the logged-in user will only see his/her records in the whole data set. As you remember, the username field in the Sales Rep table is defined as the usernames of Power BI accounts. And transactions table is also related to this table based on Sales Rep ID. So filtering one table will affect others. As a result, this single-line filter will enable dynamic row-level security in the whole Power BI solution here.
Assign users to Power BI Security.
Now Save, and publish your solution to Power BI. In the Power BI service, go to the security setting of the data set you just published (I named this 01 Dynamic).
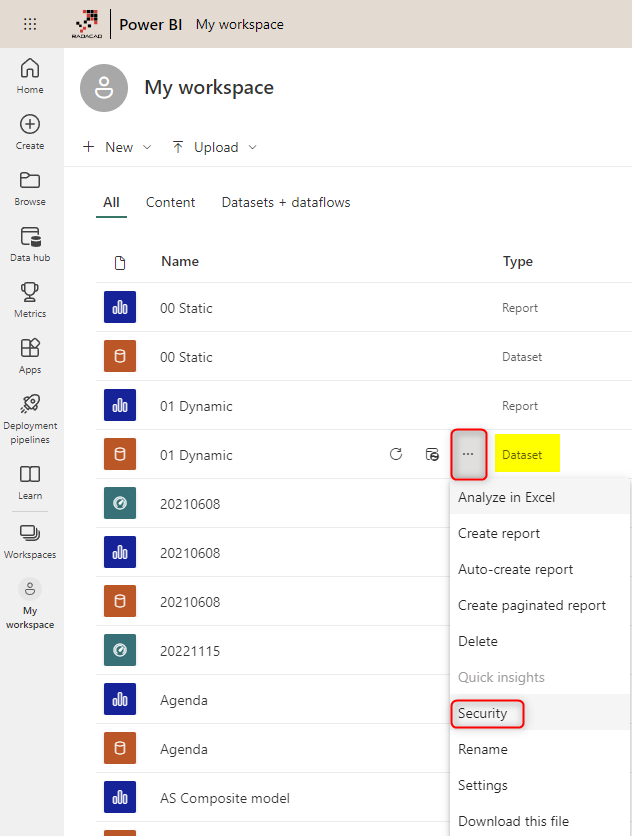
And in the Security tab, add all users to the Sales Rep role.
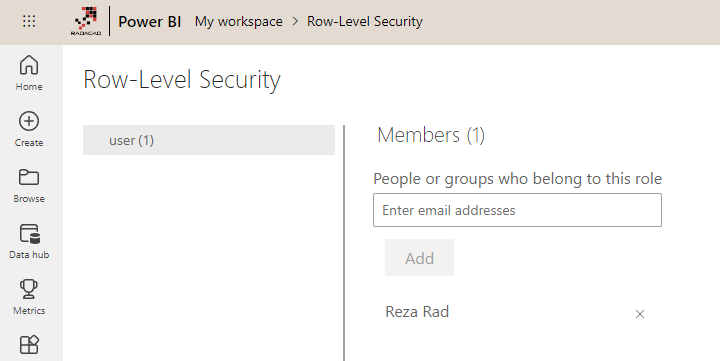
Adding a user here doesn’t mean they will see data in the report. Remember that this security is dynamic, which means that they will see their data rows ONLY if the underlying data set has a record for their username, and they will only see data rows related to their username, not others.
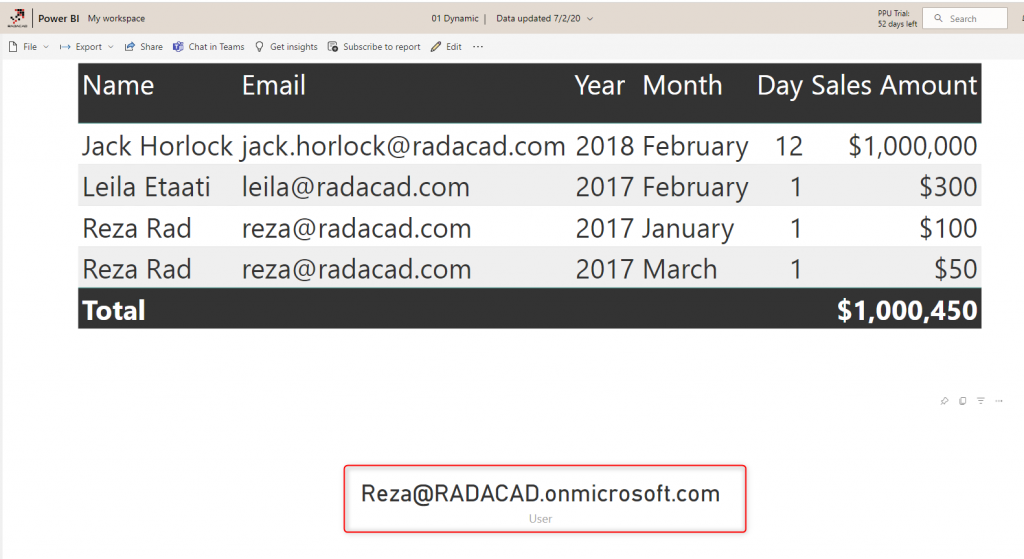
Now if you refresh the report in Power BI, you will see actual usernames.
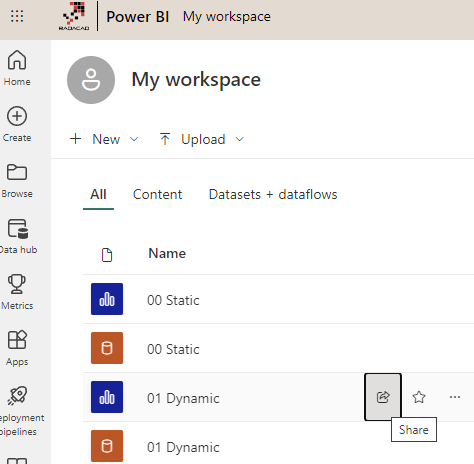
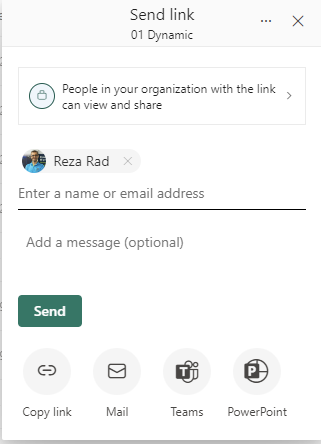
Share the Report or Dashboard
Other users should have access to the dashboard and report first to see it. You can share the report using any method that gives the user a read-only view. Here, I used the individual report-sharing option;
Now share the it with other users
Test the Security
Now, if other users open the report, and if their usernames match one of the entries in the Sales Rep table, they would see their names and data rows related to that in the report;
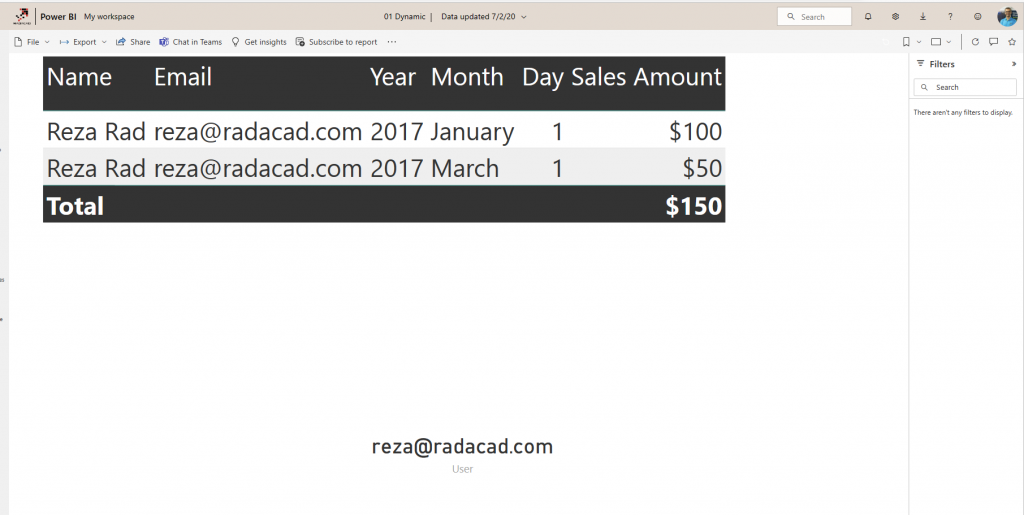
As you can see, my account only sees my transactions in the Sales Rep and Sales Transactions table. The views of other users of this report would be different.
Summary
You have seen how easy it is to use Dynamic row level security in Power BI using DAX USERNAME() or UserPrincipalName() function. With this method, users will see their view of the world. However, you must ensure that your Power BI model has a relationship set up properly. Otherwise, people might see other tables’ data when there is no relationship between their profile table to those tables. Dynamic row-level security is highly dependent on your data model, so keep your data model right.
To set up the Dynamic Row-Level Security in the right way, I recommend reading my article here:
https://radacad.com/what-do-you-need-to-implement-dynamic-row-level-security-in-power-bi


Reza is author of more than 14 books on Microsoft Business Intelligence, most of these books are published under Power BI category. Among these are books such as Power BI DAX Simplified, Pro Power BI Architecture, Power BI from Rookie to Rock Star, Power Query books series, Row-Level Security in Power BI and etc.
He is an International Speaker in Microsoft Ignite, Microsoft Business Applications Summit, Data Insight Summit, PASS Summit, SQL Saturday and SQL user groups. And He is a Microsoft Certified Trainer.
Reza’s passion is to help you find the best data solution, he is Data enthusiast.
His articles on different aspects of technologies, especially on MS BI, can be found on his blog: https://radacad.com/blog.
Hi Reza,
I reproduced your example using RLS and everything worked well. After I published it using Apps option. But it didn’t work. Is there any restriction to use RLS in Apps?
RLS should work fine for the Power BI App users. But if you have published it into a workspace, and the user has Edit (Contribute, Member, or Administrator) access on that workspace, then the user will see everything regardless of RLS.
Cheers
Reza
Thank you for this post. In our organization we have around 2000 users who should all be able to see data about themselves in the reports. Of course users come and go so the list is not static. The RLS is dynamic and driven by the data but how do you avoid having to maintain a list of 2000 users and keep it up to date.
HI Andrew
You can populate that list by querying data from Azure Active Director or on-premises active directory. Power Query has a connector for Active Director, and you can also run Power Shell scripts on a schedule basis to export that data into a database so that you can use that as your user table.
Cheers
Reza