
I have written while ago, about how to implement a dynamic row level security in Power BI. This post is an addition to that post. I’ve had a lot of inquiries that; “What If I want users to see their own data, and the Manager to see everything?”, or “How to add Manager or Director Level access to the dynamic row level security?” This post will answer this question. In this post, you will learn a scenario that you can implement a dynamic row level security. In this scenario, everyone will see their own data, but the manager will see everything. If you want to learn more about Power BI, read Power BI book from Rookie to Rock Star.
Video
Row Level Security Intro Guide
In Power BI, you can implement a row level security in a way that user has restricted access to the content in the report. This is called Row Level Security. There are different ways of implementing row level security in Power BI. Let’s see different types of it;
Static Row Level Security
The logic of security is static in the role definition, we call it Static Row Level Security. to learn more about it, read this blog post.
Row Level Security in SSAS Live Connection
In this case, the Power BI Report connected live to an SSAS model. the username will pass through effective username connection information, to learn more about it, read this post.
Dynamic Row Level Security
When you have too many roles, then implementing static roles is not an option. You need to create one role and maintain the logic of security within the data model. This is called Dynamic row level security. To learn more about this, read this blog post.
Addition to Dynamic RLS
The dynamic RLS example that I explained in this post, does not include the manager level access. Sometimes you need the manager to have access to all data. This current post explains how to do it;
Sample Dataset
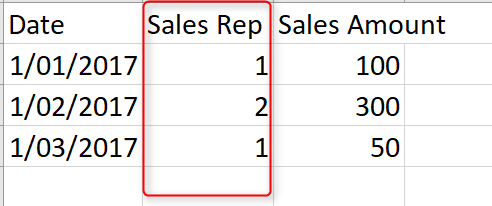
To create a scenario with manager level access, and employee level access, I created two tables as below;
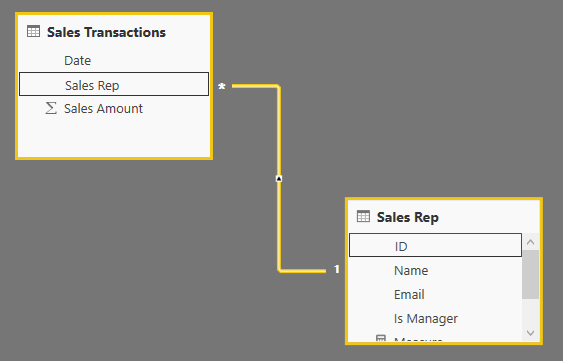
Sales Rep Table. This table has a field which is “Is Manager”, values are zero or one. If the value is one, then the sales rep is a manager and can see everything if the value is zero, then sales rep should be able to see his/her only data rows.

We also have a sales transactions table, which includes all transactions. there is a field in this table which is the link to Sales Rep.
Relationship of these two tables are based on Sales Rep and ID field obviously
Creating the Role
As you can see in the data table we can easily identify which sales transactions belongs to which sales rep. So a role logic to get only rows for every sales rep can be easily implemented with a DAX filter like this:
'Sales Rep'[Email]=Username()
I have explained that method previously in details here. However, that method does not work when I have a “manager” level access too. For a manager level access, we can make some modifications. There are multiple ways of implementing it. This is one way of doing that;
The First Step; Identify the User
The very first step is always identifying who is the person logged into the report in Power BI Service. This can be done with Username() or UserPrincipalName() functions in DAX.
The Secon Step; Is the Logged In User, Manager or Not?
We can use a DAX expression to identify is the person logged in, a manager or not. This can be done with a simple MAXX expression as below;
MaxX(
Filter(
'Sales Rep',
'Sales Rep'[Email]=Username()
)
,'Sales Rep'[Is Manager]
)
In the expression above, we are using FILTER() to identify all rows from the sales rep table, where the email address matches the logged in user. Then we get the maximum [Is Manager] value from that using MAXX() function. if the result of the expression above is 1, then the person is a manager, otherwise not.
If the User is not Manager, show only records related to the user
If the user is not a manager, then we just show the data related to him/her. this can be an expression as below;
'Sales Rep'[Email]=Username()
If the user is a manager, then show everything
an easy way of showing everything is writing a DAX expression that always returns true as a result. as simple as this;
1=1
All in One
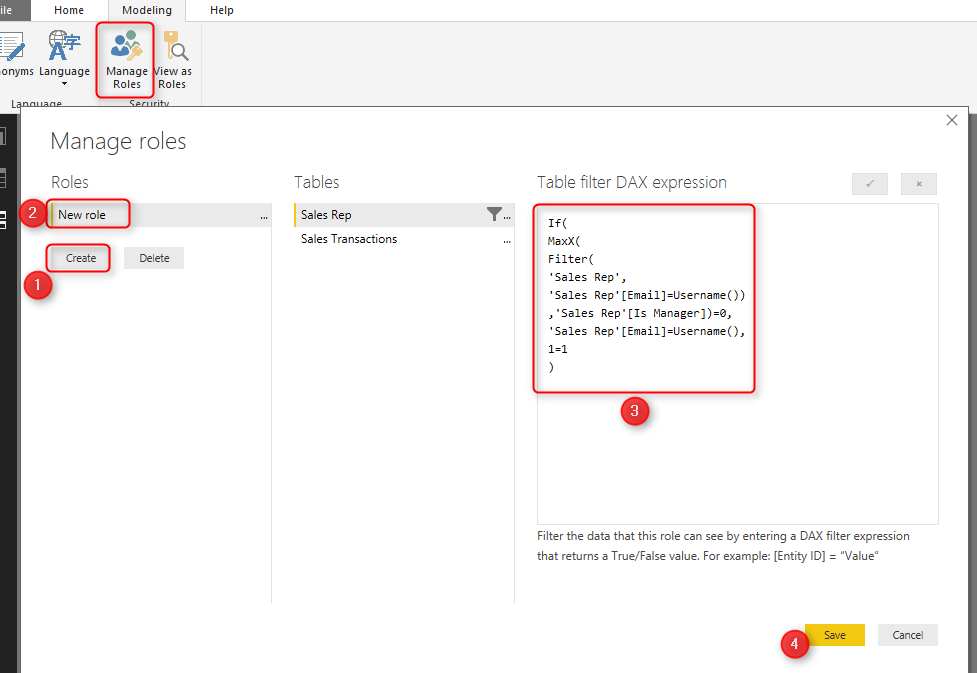
Now if we combine all these codes and logic together, we end up with an expression as below;
If(
MaxX(
Filter(
'Sales Rep',
'Sales Rep'[Email]=Username())
,'Sales Rep'[Is Manager])=0,
'Sales Rep'[Email]=Username(),
1=1
)
The expression above will show everything to the manager, and will only show related data to non-manager users.
You can create a role in Power BI under Sales Rep table with the expression above;
Test the Result
After creating this role, publish the report into Power BI, Go to Security configuration of the dataset;
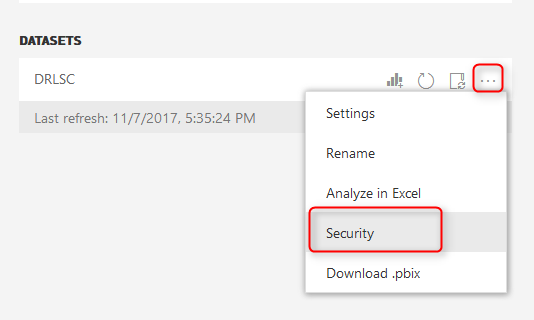
Add all users to the role. There will be no harm for this. If the user is not in your Sales Rep list, they will not see anything. If they are, they will have restricted access.

Then share the dashboard also to all users.
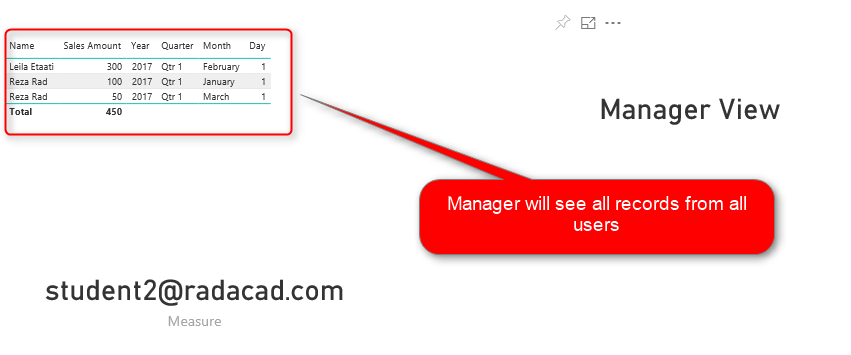
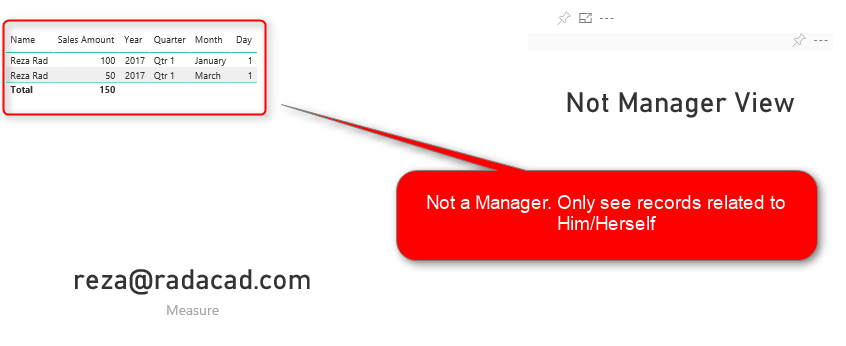
This is what Reza (Restricted user which is not manager) will see;
And this is what Mark (Manager user) will see;
Summary
In summary, this was an add-in to the row level security post. In this post, you’ve learned how you can implement a dynamic row-level security with a manager level access. This method implemented very simply, there are other ways of implementing it as well. In the future, I’ll write about other scenarios of RLS with multiple user profiles as well. If your Row Level Security requirement is different, please let me know in the comments, I would love to know about it, and can help you to implement it.


Reza is author of more than 14 books on Microsoft Business Intelligence, most of these books are published under Power BI category. Among these are books such as Power BI DAX Simplified, Pro Power BI Architecture, Power BI from Rookie to Rock Star, Power Query books series, Row-Level Security in Power BI and etc.
He is an International Speaker in Microsoft Ignite, Microsoft Business Applications Summit, Data Insight Summit, PASS Summit, SQL Saturday and SQL user groups. And He is a Microsoft Certified Trainer.
Reza’s passion is to help you find the best data solution, he is Data enthusiast.
His articles on different aspects of technologies, especially on MS BI, can be found on his blog: https://radacad.com/blog.
It’s working thank you. I was looking a solution for the same usecase